In this Photoshop tutorial we’ll explore how to create a water drop effect. we’ll use advanced layer style techniques to create the drops. Later you will learn how to create a depth map from any image, as well as how to distort any surface effectively with it. Along the way, we’ll also create a layer style based grid and custom background for a more detailed look and much more!
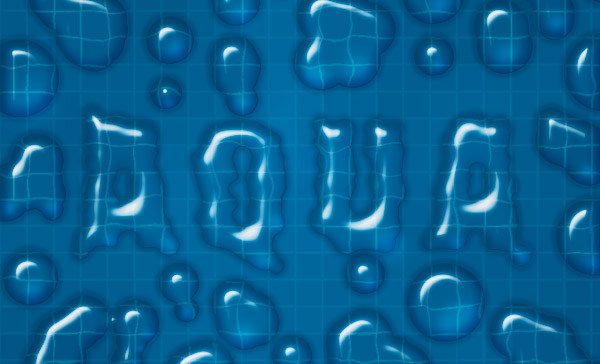
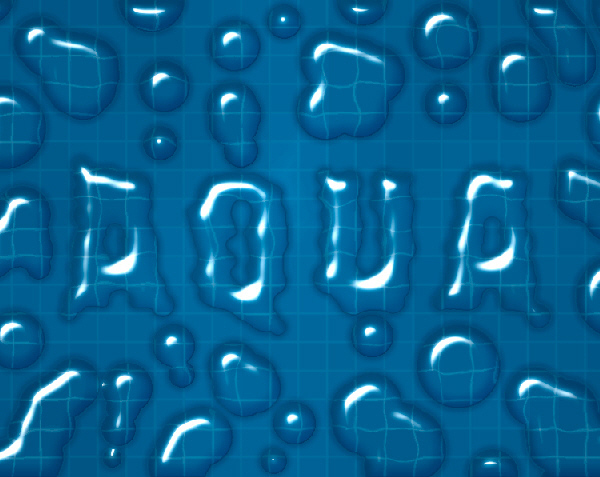
Final Image
As always, this is the final image that we’ll be creating:
Tutorial Details
- Program: Adobe Photoshop CS5
- Estimated Completion Time: 50 minutes
- Difficulty: Beginner-Intermediate
Step 1
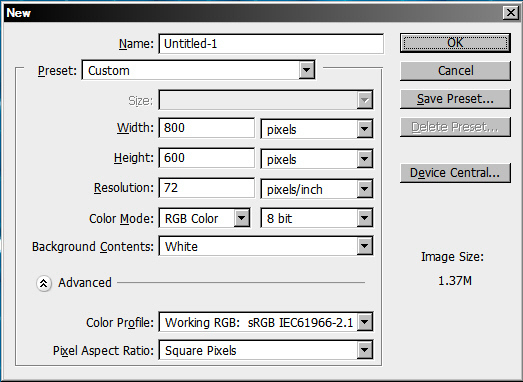
Open a new file (File > New) in Adobe Photoshop with the following settings. Save the file as “Water Drop Effect.psd”. During work remember to frequently use File > Save (Ctrl + S) to save and update the file.
Step 2
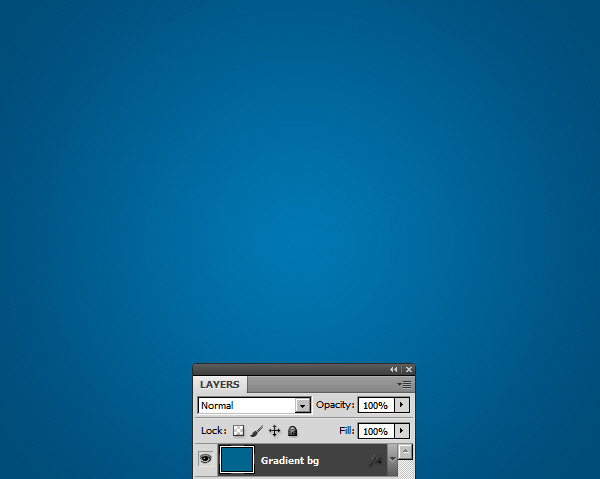
Double click on the background layer to change to a normal layer. Rename it “Gradient bg”. Background layers are by default locked layers. Due to the restricted nature of the background layer it is not possible to apply layer styles directly on it. So we need to change it to a normal layer before carrying out any such operations.

Step 3
Now change the Foreground and Background colors below the Tools panel using the screenshot for guidance.

Step 4
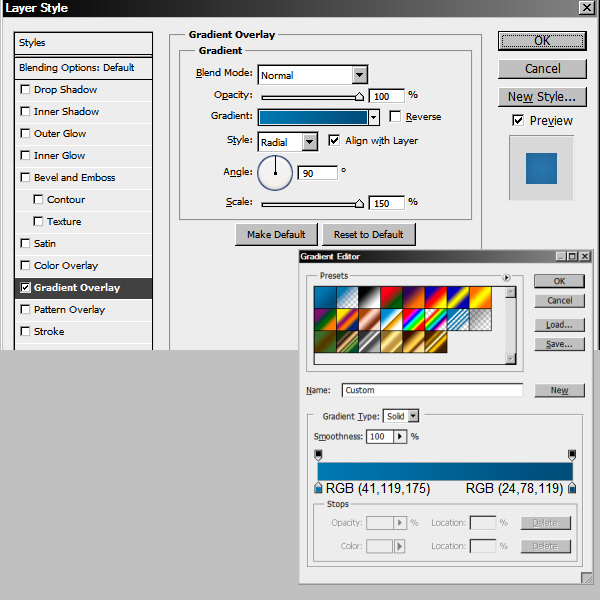
Again double click on the “Gradient bg” layer to open the Layer Style window. Then at the left side click on Gradient Overlay. This will select the entry and display the Gradient Overlay option at the right side. Click on the gradient bar at the right side to open the Gradient Editor. Match the settings in the screenshot.
Step 5
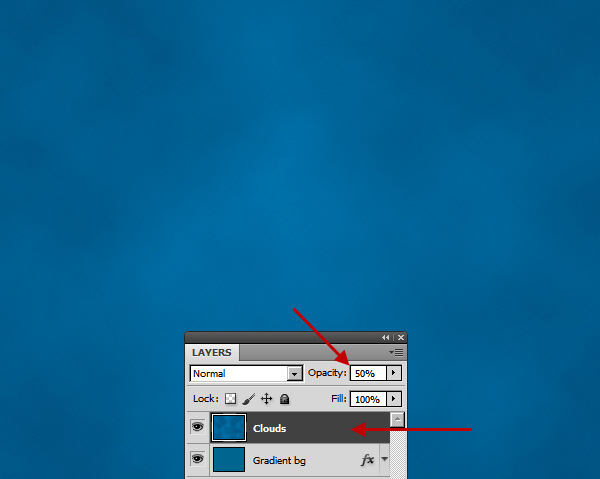
Create a new blank layer with the name “Clouds” on top of “Gradient bg” layer and apply the Clouds filter from Filter > Render > Clouds. Clouds filter generates a random cloud pattern using the foreground and background color. Each time you apply the filter it will generate a different pattern. Due to this random nature, your cloud pattern will be different from mine. But the exact pattern is not important here. Basically we are using it to create some shade variation of the surface. Apply the Clouds filter a couple more times until you are satisfied with the look.

Step 6
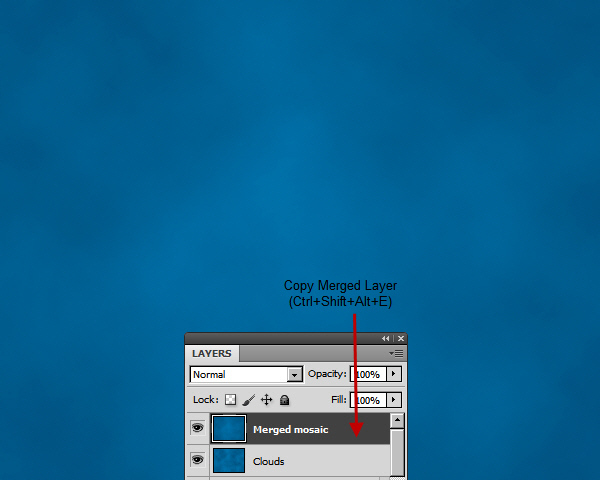
Reduce the opacity of the “Clouds” layer to 50%. Then create a copy merged layer on top of these two layers by pressing Ctrl+ Shift+ Alt+ E. Rename it “Merged mosaic”. This command (Ctrl + Shift + Alt + E) will first merge the layers below and then paste it as a new layer at the top. This is a flexible workflow as we can always go back later and experiment with layer opacity and maybe blend modes of these two layers and then repeat the copy merged process again. But when making adjustments to your layers, always remember to turn off the visibility of the merged layer at the top of the layers palette or you will not be able to see the result of any effects you apply.
Step 7
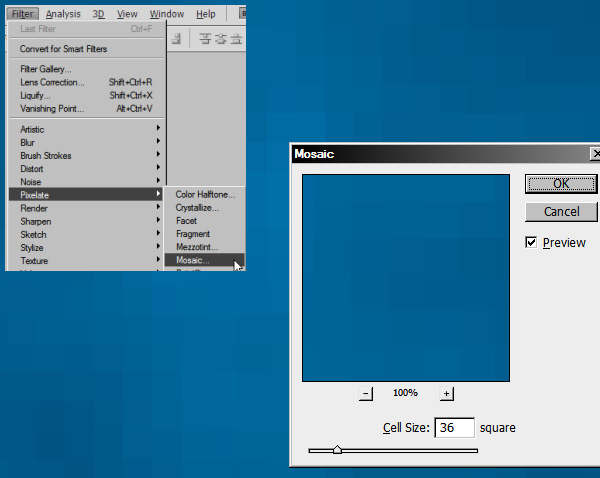
Next step, apply Filter > Pixelate > Mosaic with a cell size of 36.

Step 8
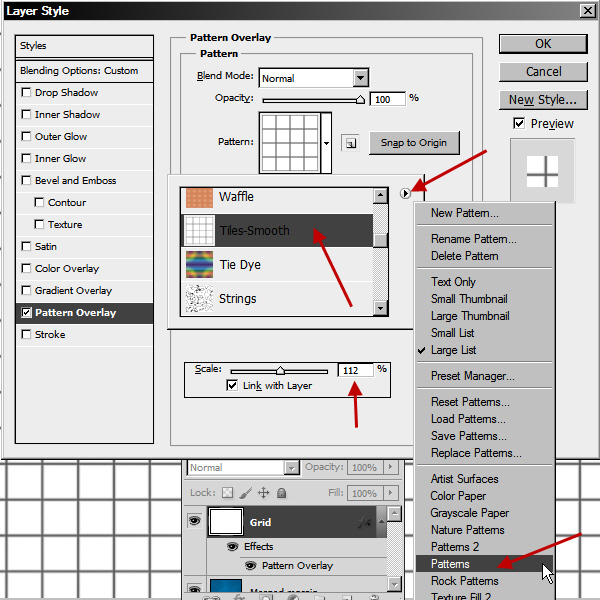
Now we’ll create a grid layer on top of this with a layer style. Create a new layer with the name “Grid” and open the layer style window. Use the settings for Pattern Overlay from the screenshot.
Step 9
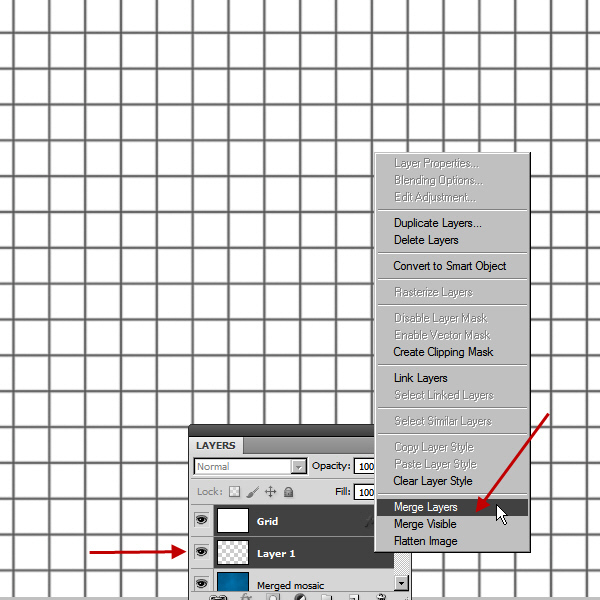
But we need a transparent white grid pattern. For that we have to ‘Fix’ the layer style of the “Grid” layer. Create a new blank layer below the layer “Grid” and select both the layers by shift clicking on the “Grid” layer. Now right click on “Grid” layer and choose Merge Layers.
Step 10
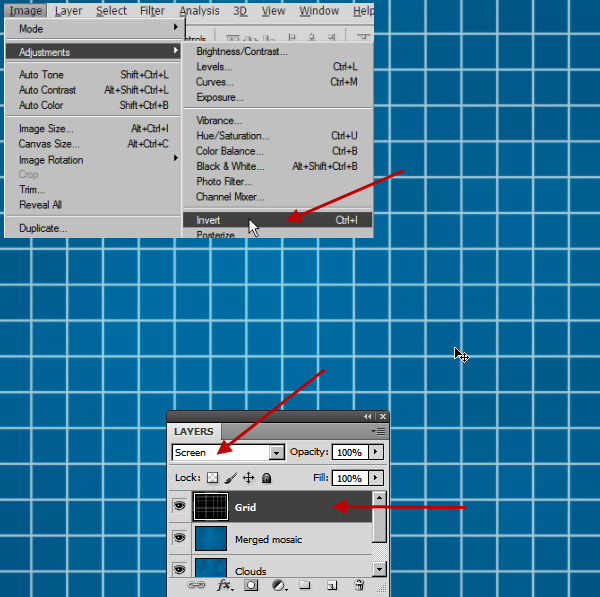
With “Grid” layer still targeted, apply Image > Adjustments > Invert. Now we have a white grid pattern on a black layer. So we need to apply a blend mode which will hide the black color. Change the layer blend mode to Screen and you can see that only the white grid is visible.
Step 11
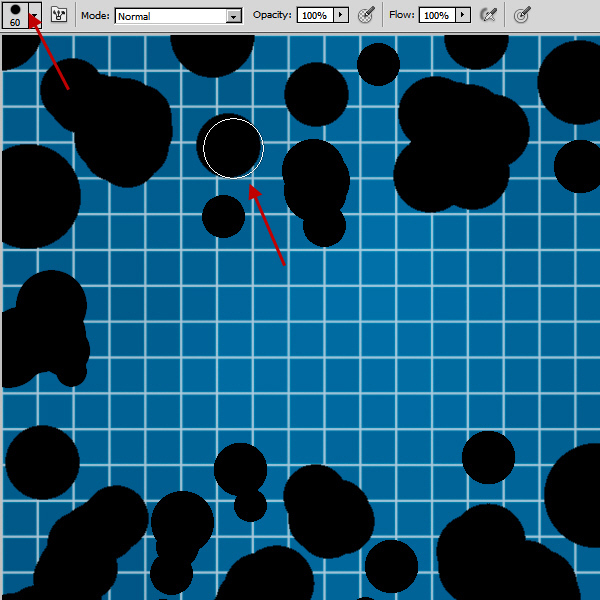
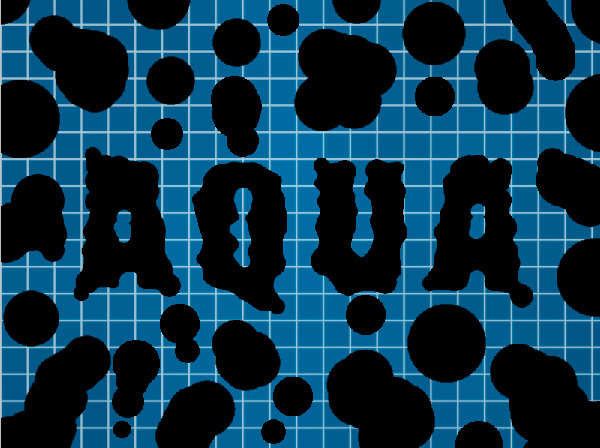
Let’s create the drop shapes now. Create a new blank layer with the name “Water drop shapes”. Select a hard round brush and draw the water drop shapes. Leave the center empty for the “Aqua” text. Be creative and create your own shapes. Matching my water shapes is not the objective. If you are not comfortable with drawing, Google some water drop images for reference. Below is the completed water drop shapes.
Step 12
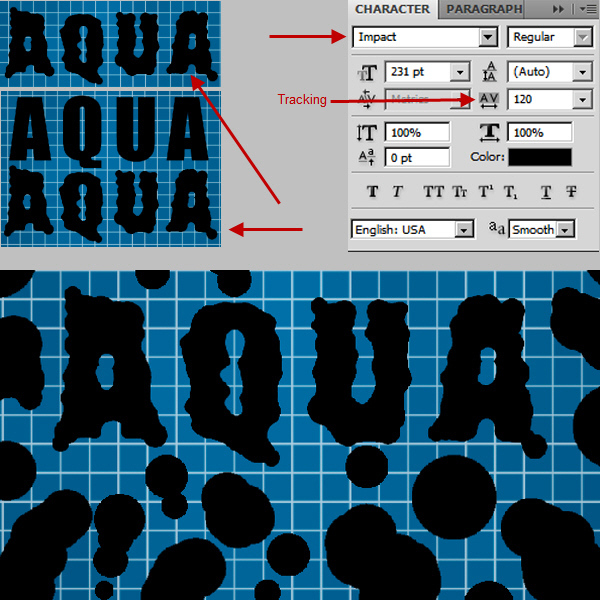
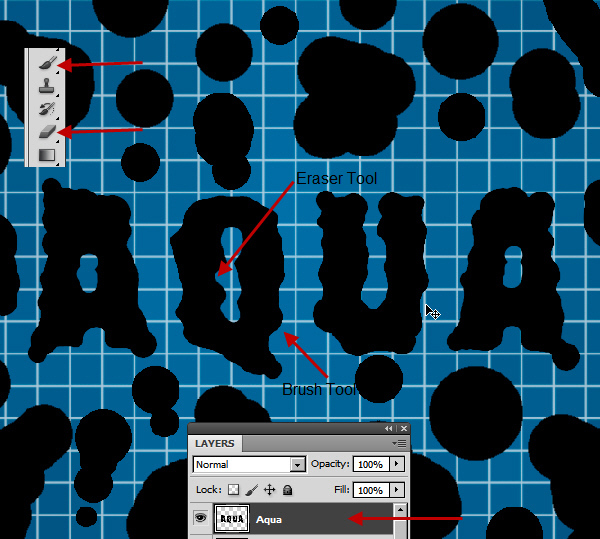
Now complete the “Aqua” text by following the same method. In my case, I first typed the “Aqua” text with the font Impact. Then rasterize the text layer by right clicking on it and choose Rasterize. After that I select a hard round brush to paint or change the shape. I made the inside of the letters also irregular by using a hard round eraser. So basically, you use a hard round brush and eraser combination to change the shape of the “Aqua” text.
Step 13
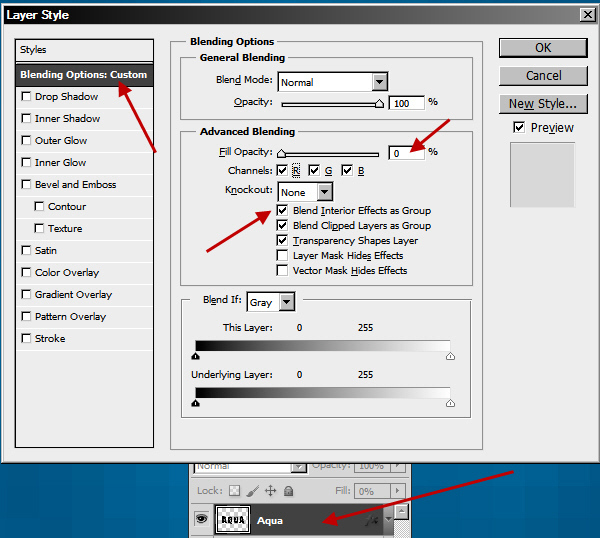
It’s time to create the Layer Styles. We start with the “Aqua” layer. we’ll combine Bevel and Emboss, Inner Shadow, Outer Glow and Stroke to create the desired look. But first we need the layer style to be transparent. So the grid background will be visible through it. Double click on the “Aqua” layer to open the Layer Style window. At the right side under the Blending Options, in the Advanced Blending section first check the Blend Interior Effects as Group option. Then change the Fill Opacity above that to 0%. This will make the layer style transparent. Check the screenshot below for reference.
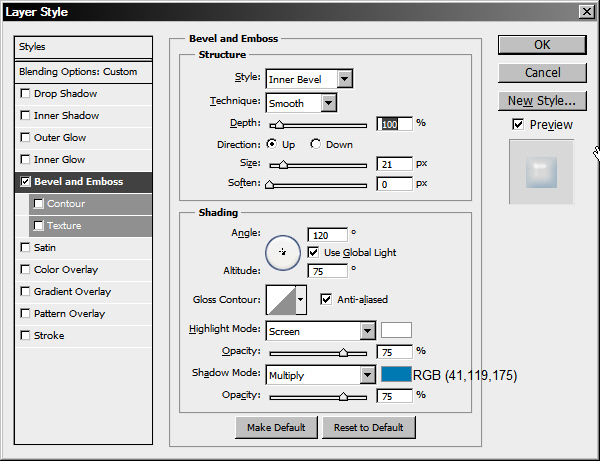
Step 14
Bevel and Emboss settings.
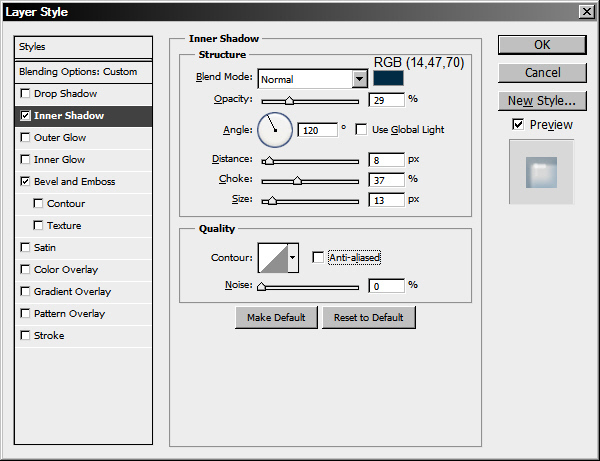
Step 15
Inner Shadow settings.
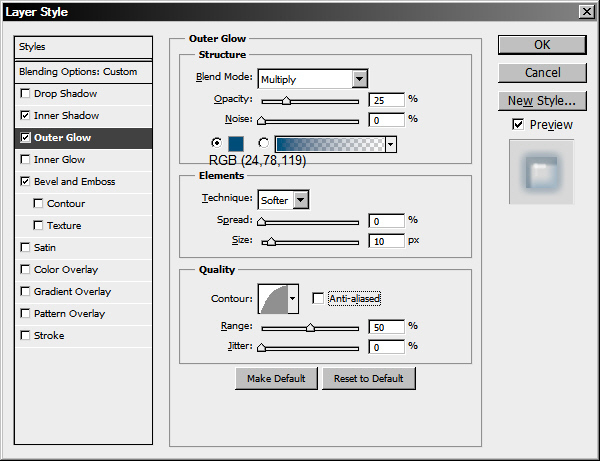
Step 16
Outer Glow settings.
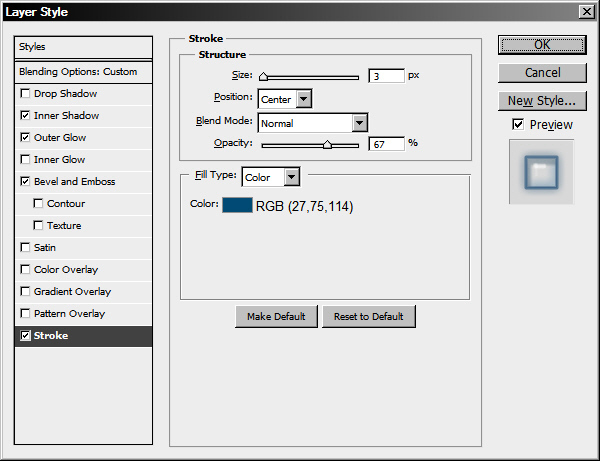
Step 17
Stroke settings.
Step 18
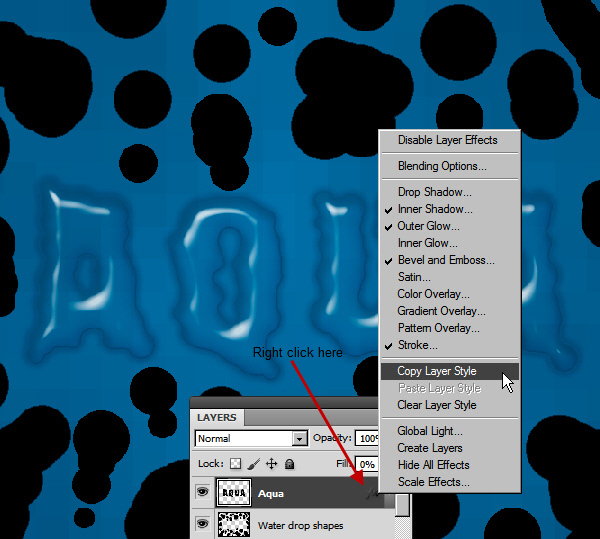
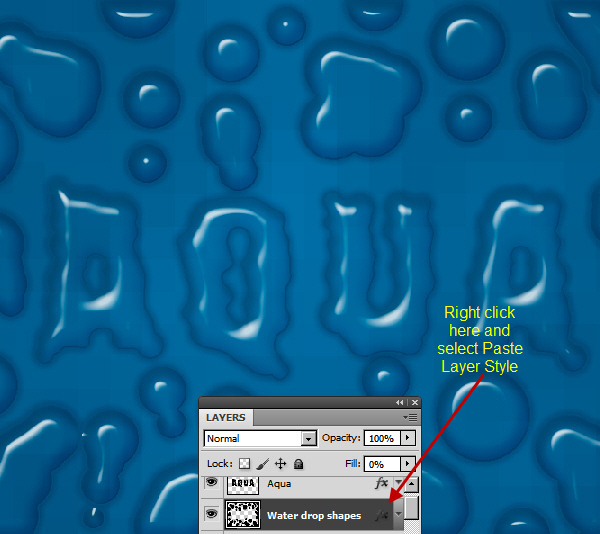
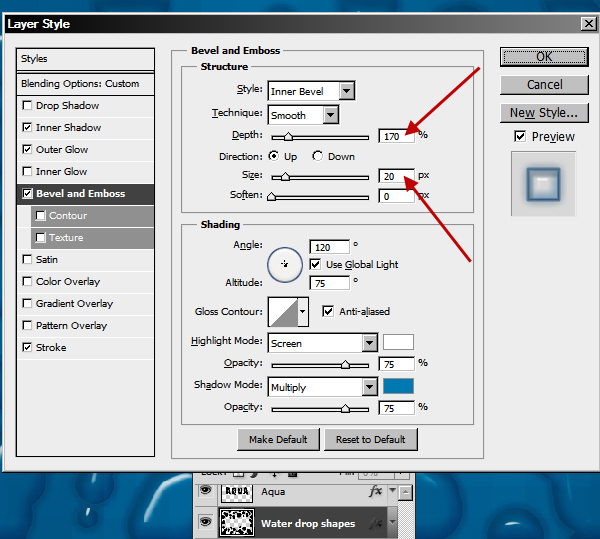
The “Aqua” text style is now complete. we’ll now copy and paste this style to the “Water drop shapes” layer and tweak to create a slightly different look. In the “Aqua” layer right click on the Layer Style icon at the right side and choose Copy Layer Style. Then right click on the “Water drop shapes” layer and choose Paste Layer Style. As you can already see, this is a great time saver. we’ll create a slightly different look now by changing the Bevel and Emboss settings. In the Bevel and Emboss, we’ll only change the Depth and the Size values. Below are the screenshots.
Step 19
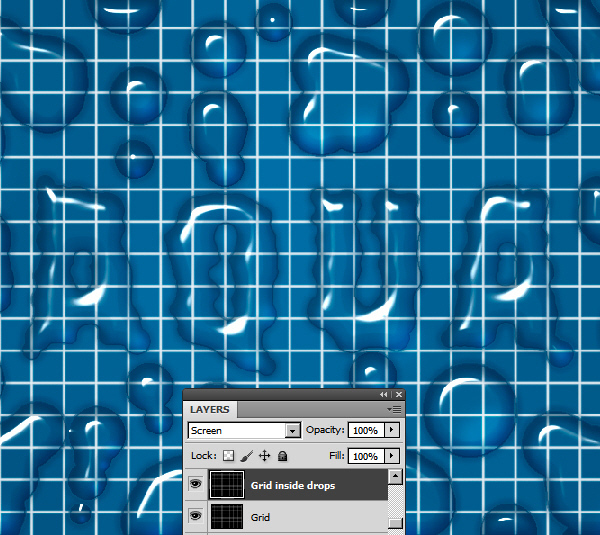
Let’s distort the areas of the grid pattern, which are visible through the water drop shapes only. But for this we need to separate the “Grid” layer into two different layers. Right click on the “Grid” layer and choose Duplicate Layer. Rename the duplicate layer “Grid inside drops”.

Step 20
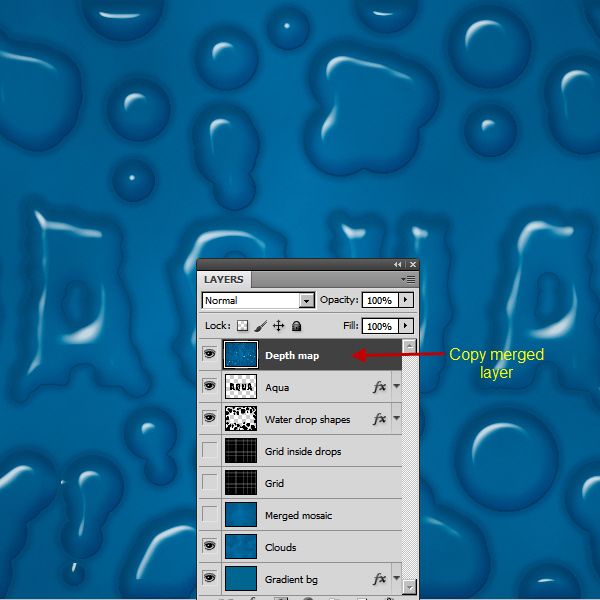
Next we’ll use the Glass Filter to distort the grid pattern. But we also need to distort the grid pattern, matching the volume or 3d portions created by the layer style of “Aqua” and “Water drop shapes”. The grid pattern should distort by following the contour of the layer style. To achieve this effectively with the Glass Filter we need a Depth Map. A Depth Map is a special grayscale image within which the volume or depth information is embedded. The Glass filter will read the depth or high and low area information from the light and dark portions of the grayscale image. Because in the world of depth map, white is height (or peak) and black is low (or shallow). And everything (gray values) falls in between. First turn off the visibility of the “Grid”, “Grid inside drops” and “Merged mosaic” layers by clicking on the eye icons at the left side of the layers. Now turn on the visibility of both “Gradient bg” and “Clouds” layers. Now click on the “Aqua” layer to make sure that it is the current targeted layer. Then press Ctrl + Shift + Alt + E to copy merged and paste the visible layers on top of the “Aqua” layer. Rename this newly created layer “Depth map”. See the screenshot below.
Step 21
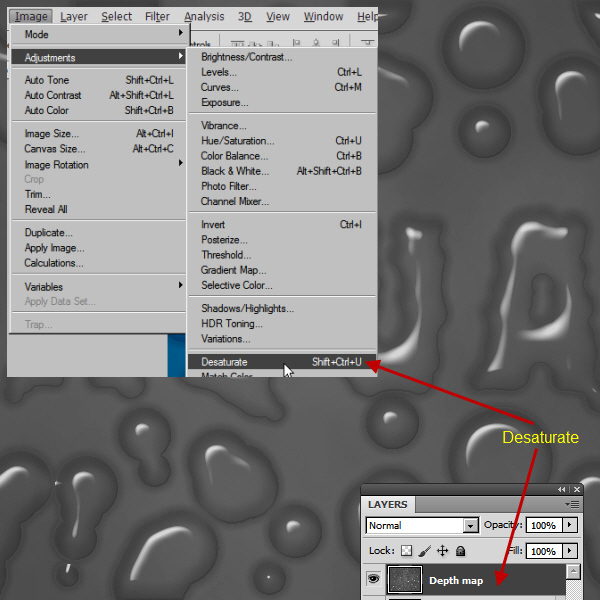
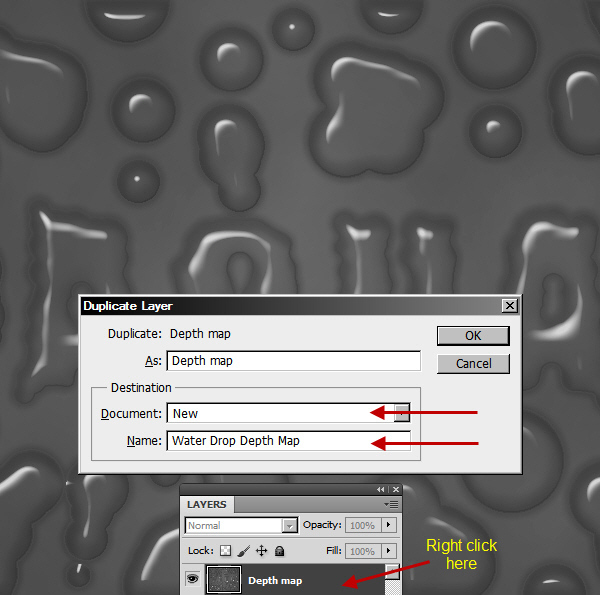
Select Image > Adjustments > Desaturate to change the “Depth map” layer to black and white. Now we need to create a separate grayscale file from this layer. Right click on this layer and choose Duplicate Layer. Click the Document drop down menu and choose New. This will create a new file with this layer only. In the Duplicate Layer dialogue box type “Water Drop Depth Map” in the name field. choose New in the Document drop down menu. In the new file (“Water Drop Depth Map”) right click on the “Depth map” layer and choose Flatten Image. Now use from Image > Mode > Grayscale. This will remove the color information. Then save this file as a PSD file and close.

Step 22
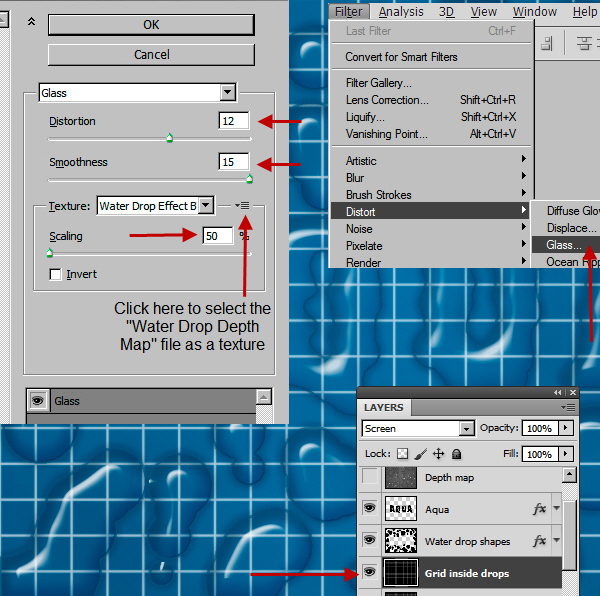
Back in the “Water Drop Effect”, turn off the visibility of the “Depth map” layer. Then turn on the visibility and target “Grid inside drops” layer. Then select from Filter > Distort > Glass. Use settings from the screenshot below.

Step 23
So the grid pattern is distorted now. But we want to see the distorted areas only within the water drops. It’s time to create a mask for this layer. We use a Mask to hide layer contents. There are two types of Mask in Photoshop – white and black. The Mask also follows the same principle as the depth map. The only change is, here white means visible and black means not visible. Mask is an example of non destructive workflow. Because you can always delete the mask later or make any changes within. We are not directly changing the layer. So first we need to define the areas which we want to mask. First Ctrl-click on the layer thumbnail of the “Aqua” layer. Check the screenshot below:
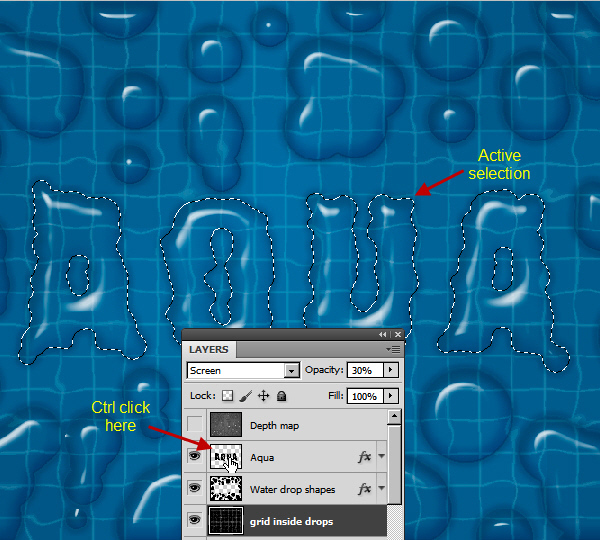

Step 24
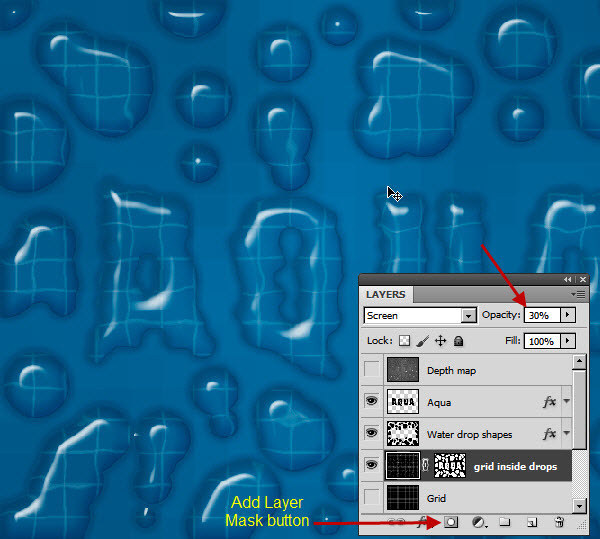
The “Aqua” layer content is loaded as a selection, Ctrl + Shift click on the “Water drop shape” layer thumbnail. With an already active selection if you Shift-click on another layer thumbnail, then the new selection of this second layer will add to the existing selection. So now we have an active selection combining these two layers. Now target the “Grid inside drops” layer and click “Add Layer Mask” button (Third from left) below the Layers Panel. The grid pattern should now be visible only within the layer style applied areas. Now Change the layer opacity to 30%. Below is the screenshot with the mask.
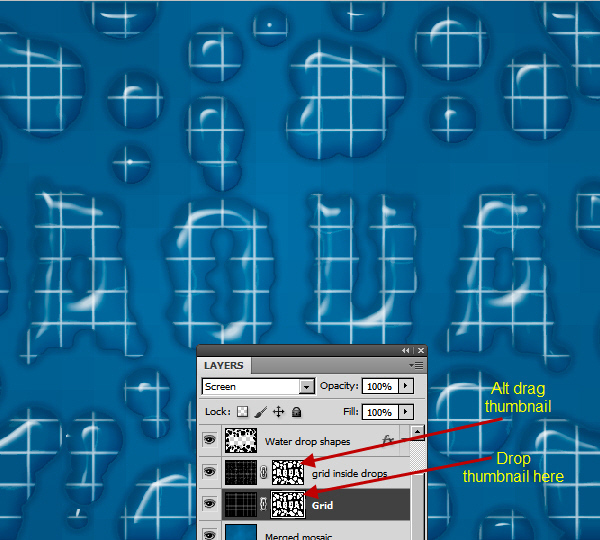
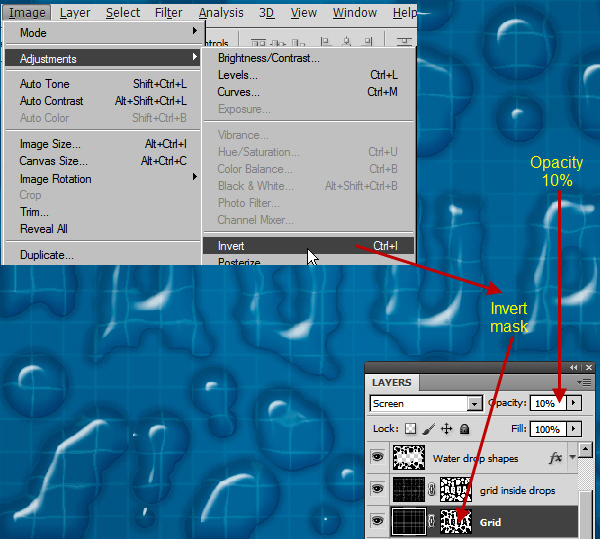
Step 25
Let’s create the mask for the “Grid” layer. Click on the mask thumbnail of the “Grid inside drops” layer, press Alt-key and drag and drop the mask thumbnail on “Grid” layer. This way we can copy the mask from one layer to another layer. Now both “Grid” and “Grid inside drops” layers are sharing same type of mask. Click on the mask thumbnail of “Water drop shape” layer and then Image > Adjustments > Invert. This will invert the mask, so the black and white portions will swap. As a result, the normal grid pattern (Not distorted) is only visible in the “Grid” layer. Now change the Opacity of “Grid” layer to 10%. Check the screenshots below.
Step 26
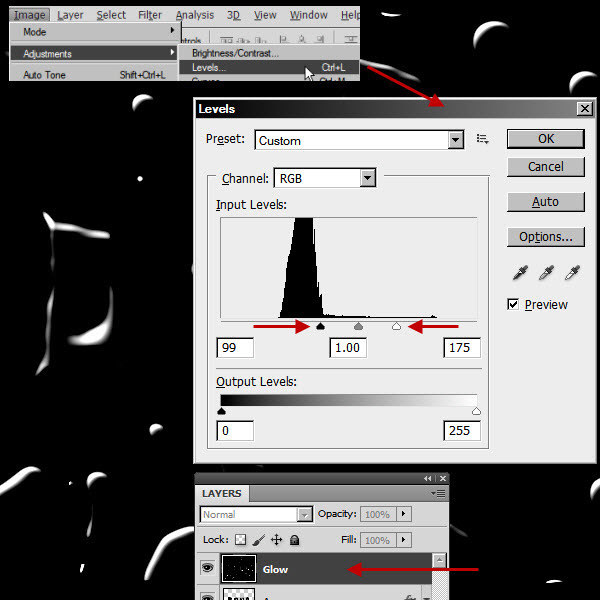
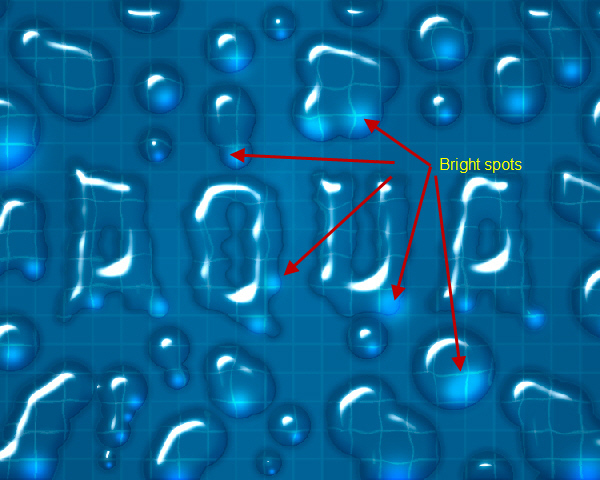
Next we’ll create the soft glow on top of the highlight areas of drop shapes and aqua shape. This is a typical feature of water drops. Turn on the visibility of the “Depth map” layer. Then rename it “glow”. Layer still targeted Image > Adjustments > Level. we’ll change the gray areas or midtones within the image into black. This way we’ll separate the white areas. Below is the screenshot after level adjustment has been applied.
Step 27
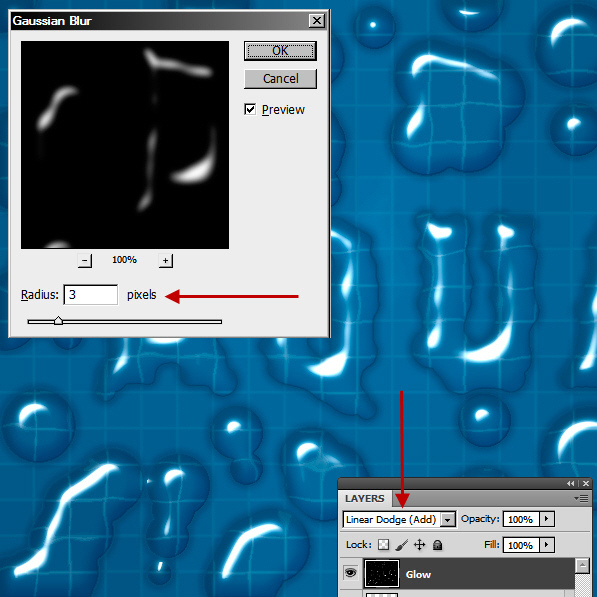
Then from Filter > Blur > Gaussian Blur with a value of 3 pixels. Change the blend mode to Linear Dodge (Add).
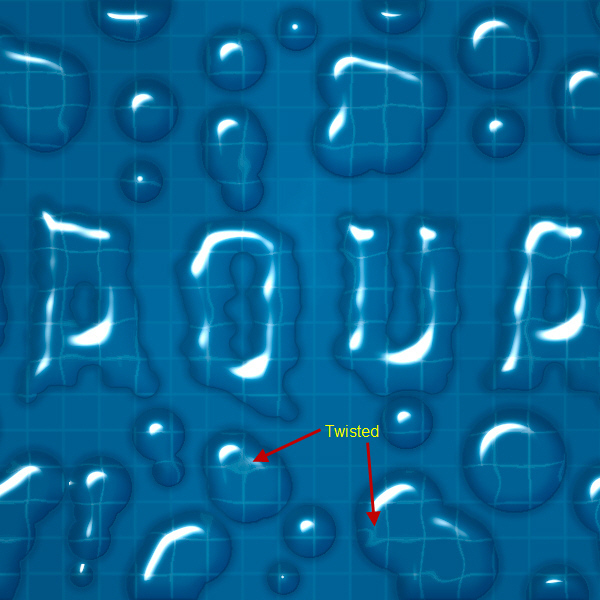
Step 28
Next we’ll fix the distorted grid layer. If you look carefully, in some of the areas the grid looks twisted. we’ll easily correct that with the Liquify filter.
Step 29
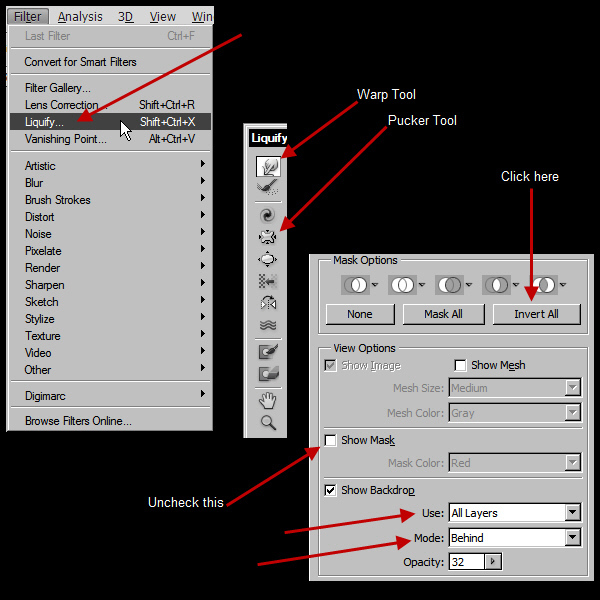
Target “Grid” layer and go to Filter > LIquify. In the Liquify interface at the right side, under the Mask Options, click the invert all button. We are doing this because there is an active mask in the “Grid” layer. Now we can distort the grid within the drop and the aqua shapes. Also uncheck Show mask within the view option. Under the Show backdrop section, select All Layers and Behind options. we’ll only use the Warp Tool and Pucker Tool. With the Warp tool we’ll distort the grid a little in those areas, where the grid should be more distorted. The Pucker Tool will help to make the twisted areas really small. Check the screenshots below for reference. Take a medium to large brush size when you are using the Warp Tool. A small brush size will smudge instead of move. Slowly in small increments click and drag with the Warp Tool to distort the grid. When using the Pucker Tool, just click and hold don’t drag. Then it will reduce the size of those twisted knot shapes. The Liquify process is time consuming. So be ready for some trial and error steps. But this is a great tool to distort anything, the way you want.

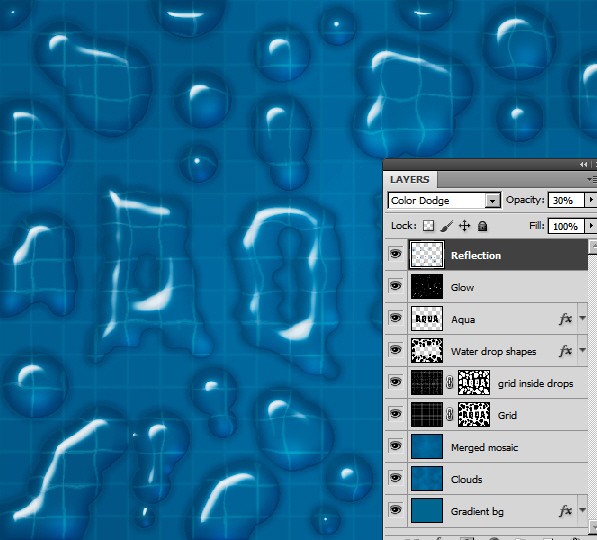
Step 30
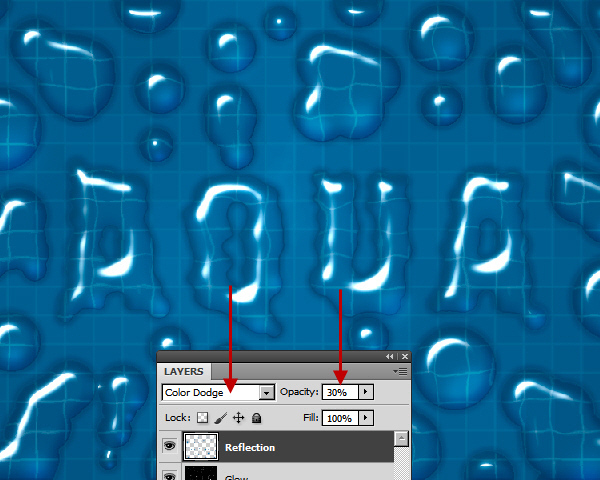
we’ll add one last touch to complete the effect. Create a new layer with the name “Reflection” on top of “Glow” layer and change the blend mode to Color Dodge. Select a soft brush with a medium blue color (RGB 41, 119, 175). Paint some blue spots in the opposite direction of the highlight areas. After painting reduce the opacity of the layer to 30%.
Step 31
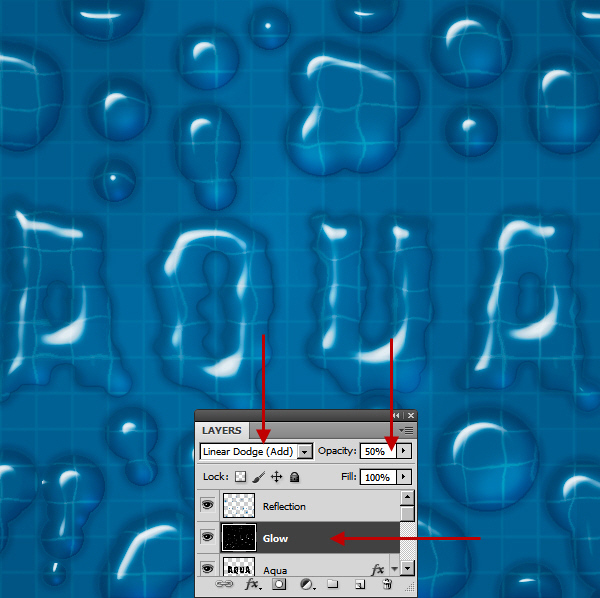
Finally, change the opacity of the “Glow” layer to 50%.
Conclusion
Congratulations, Advanced Water Drop Effect is now complete. Below is the final arrangement of the Layers Panel.
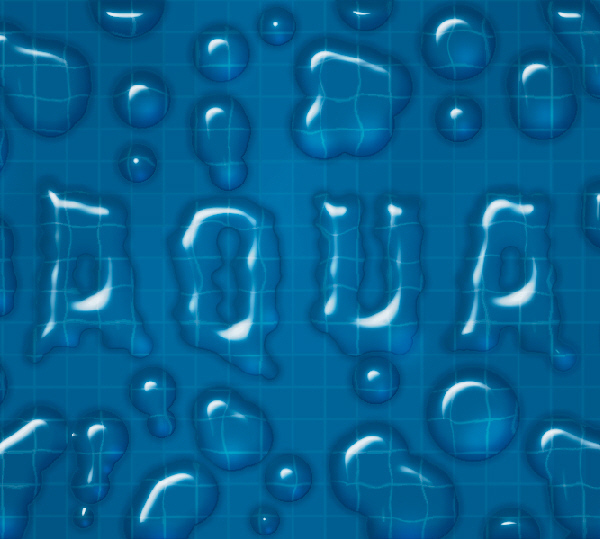
And We’re Done!
Below is the final result.