In this tutorial we will explore how to create a realistic eroded gold effect from a custom bump map. You will learn bump map creation techniques as well as how to distort any surface effectively with that bump map. Then you will combine Layer Style with it to create a 3d look. Then we will add a custom lens flare, glow, streaks and other details to achieve the final look.
You will also master the Lighting Effects Filter as well as various tips and tricks and much more!
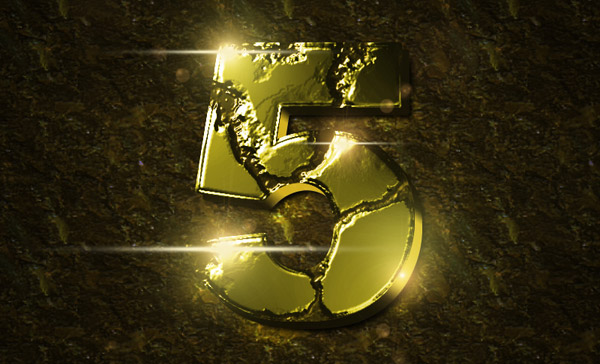
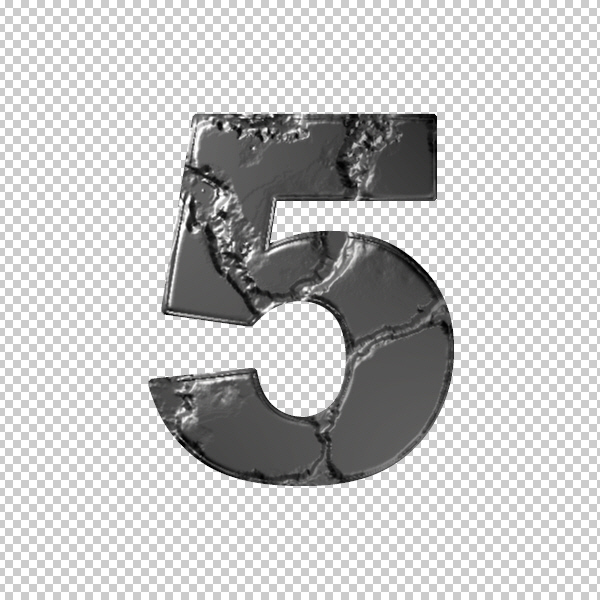
Final Image
As always, this is the final image that we’ll be creating:
Tutorial Details
- Program: Adobe Illustrator CS5
- Estimated Completion Time: 45 minutes
- Difficulty: Beginner-Intermediate
Step 1
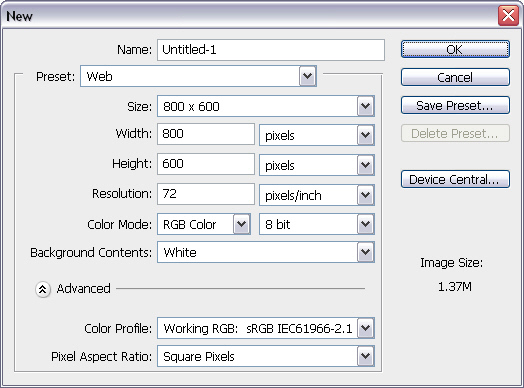
Open a new file (File > New) in Adobe Photoshop with the following settings. Save the file as “Eroded Gold.psd”.
Step 2
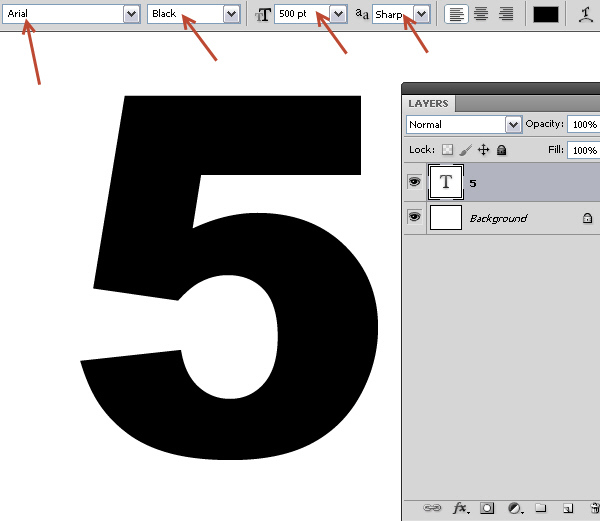
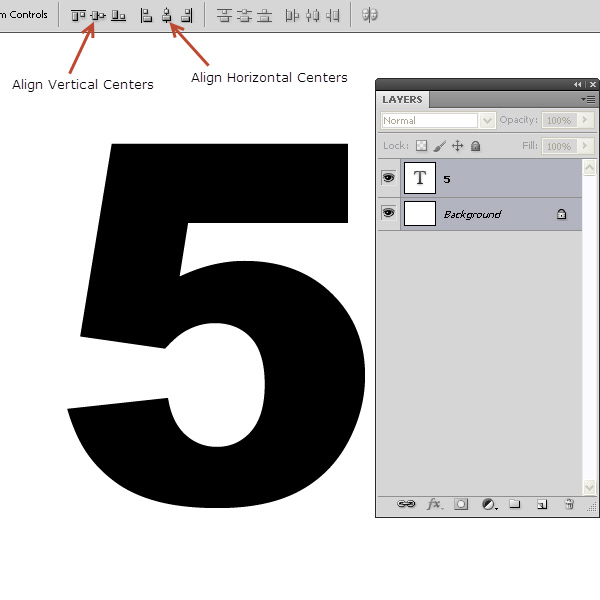
Select the Type Tool (Or press T), then type the numeric digit “5”. Here I’m using Arial Black, size 500 pt.
Step 3
Select the Move Tool (V), then click the layer “5” and shift/click to select the background layer. When you select more than two layers, alignment buttons are active on the Options Bar. Now click Align Vertical Centers and Align Horizontal Centers buttons on the Options Bar. This will center the “5” layer.
Step 4
Now press “D” and then “X”. “D” will reset the foreground-background colors to default black-white and “X” will make white the foreground color.
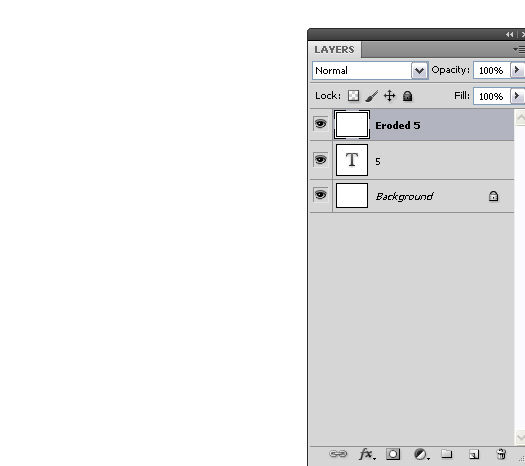
Create a new blank layer (Ctrl + Shift + N) above “5” layer. Rename this layer “Eroded 5” and press Alt + Backspace to fill with white. We will create the eroded textured background on this layer with the help of the Lighting Effects filter. But to produce an effective result the Lighting Effects filter needs a Bump map. In the next step we will create that bump map within an alpha channel.
Step 5
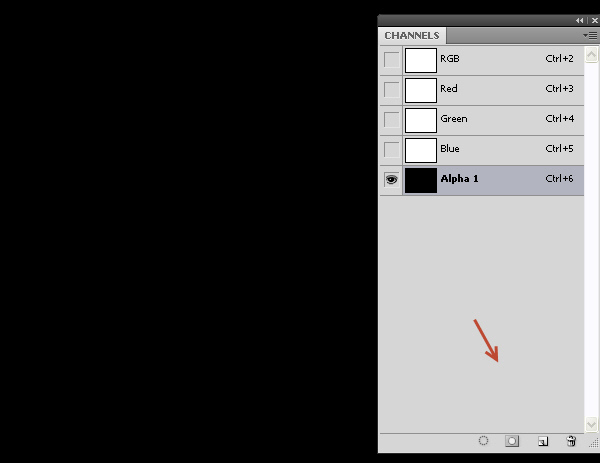
Click on the Channels panel and then create a new alpha channel by clicking on create new channel button (third button from left) below the Channel Panel. Alpha channels are used for storing transparency information or simply selections.
Step 6
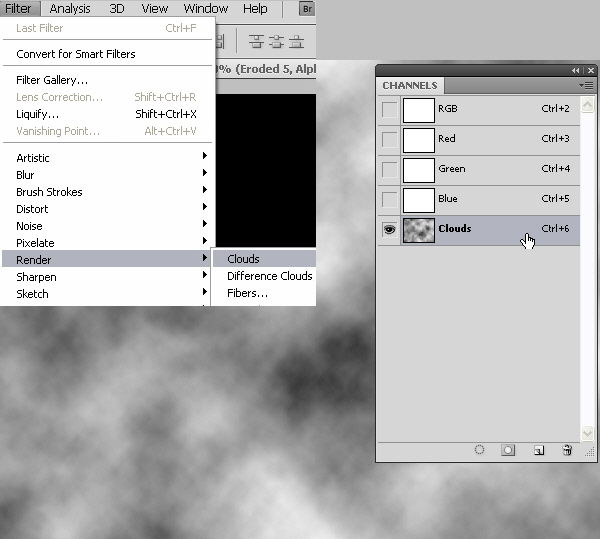
A Bump Map is basically a grayscale image, where white is height and black is depth and 50% grey is neutral, i.e., neither height nor depth. Target the newly created alpha channel by clicking on it and select Filter > Render > Clouds. The Clouds filter generates a random cloud pattern that varies between the current foreground and background color, each time you apply the filter. Apply the Clouds filter a couple more times until you get an even distribution of grey values. Rename the alpha channel “Clouds”.
Step 7
Now we will apply the Difference Clouds filter on top of this cloud pattern to enhance it more. Difference Clouds blend the current foreground and background colors with the contents of the selected layer. Apply Filter > Render > Difference Clouds. This will add more depth and contrast to the existing Cloud pattern.
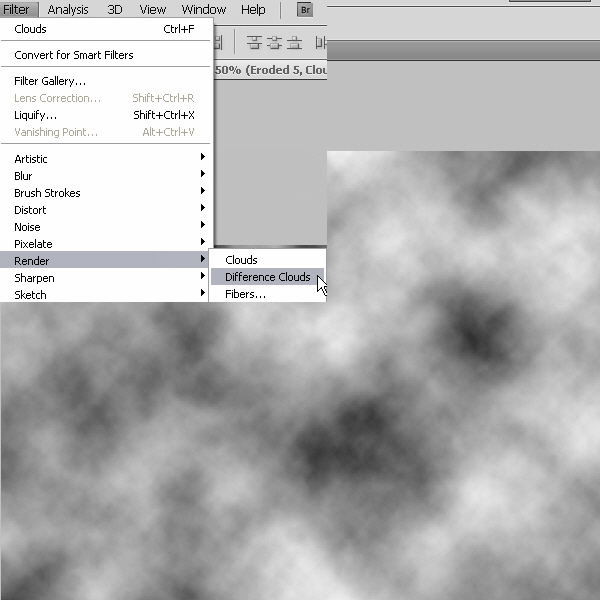
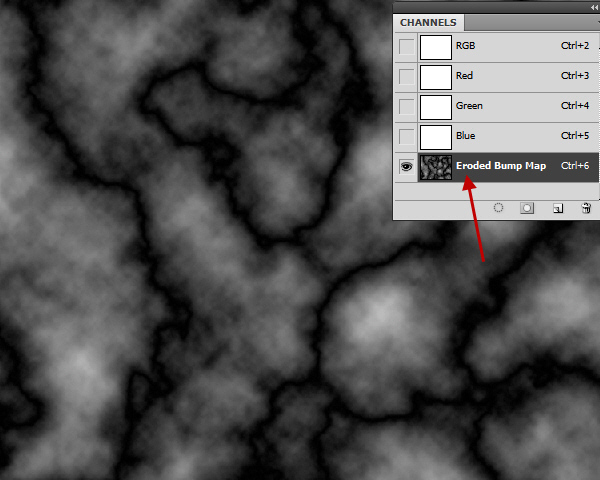
Apply a few more times until there is an interesting pattern. Rename the alpha channel “Eroded Bump Map”. Now the bump map for our Eroded surface is ready.
Step 8
Go back to the Layers panel and Ctrl-click on the “5” layer to load that text as a selection.
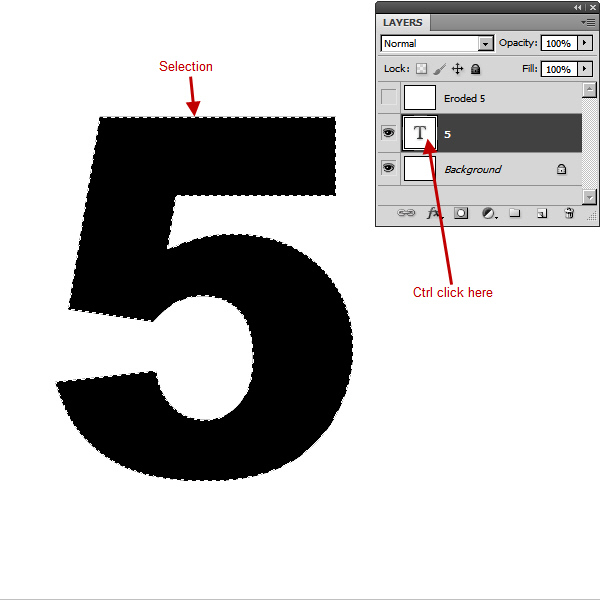
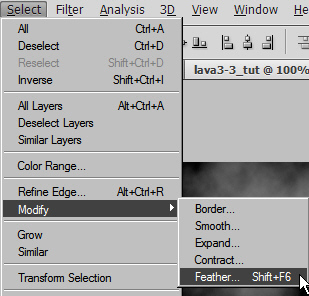
Step 9
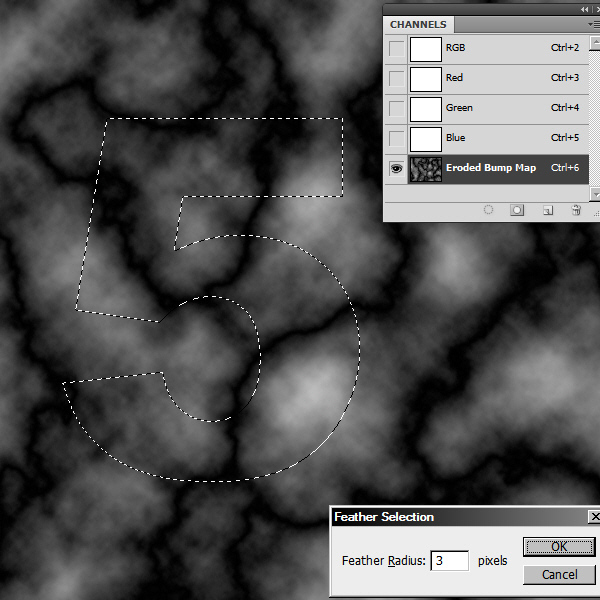
Return to the Channels panel and target the “Eroded Bump Map” alpha channel. Then Select > Modify > Feather.
Use 3 pixels as the Feather radius value.
Step 10
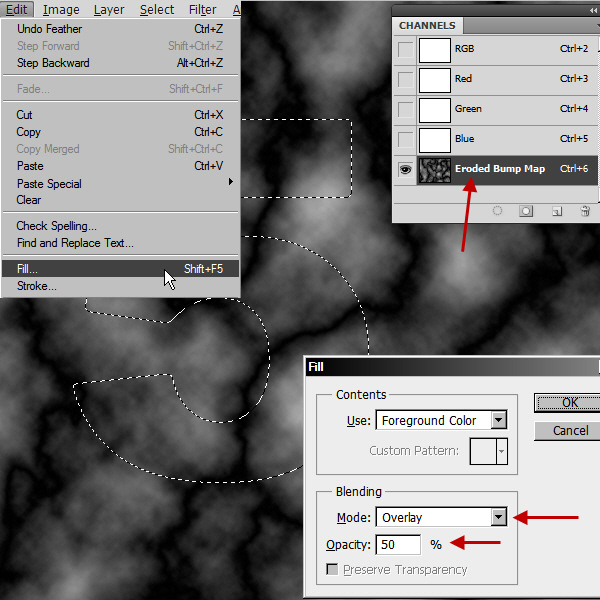
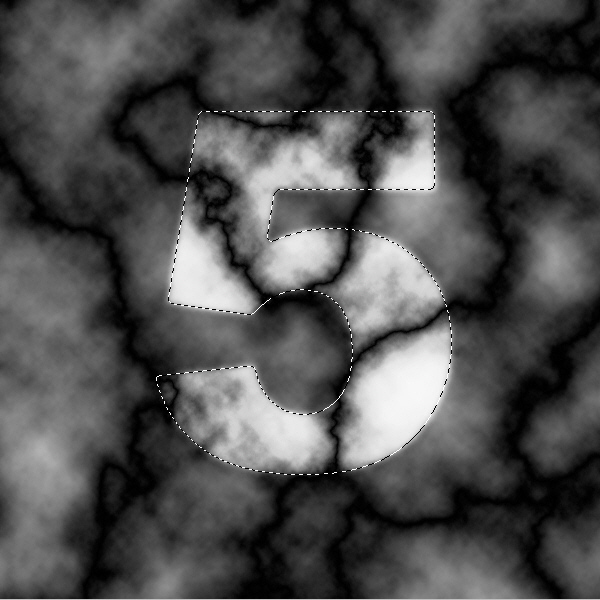
From Edit > Fill and apply the settings from the screenshot below. Fill twice more (Total 3 times) with the same settings. Then deselect by pressing Ctrl + D or Select > Deselect.
Step 11
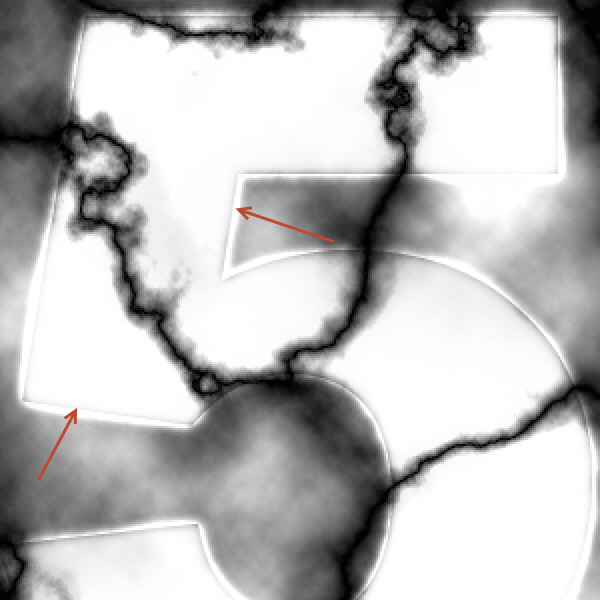
We need a fresh selection without the feather for the next step. Ctrl-click on the “5” layer to load that text as a selection. Then select the Brush tool (Press B) and black as the color. In the Options Bar click on the Brush Preset and select a soft brush. Then change the Blend Mode to Overlay. Change the Brush opacity to 50% and start painting within the selection. Paint on the dark areas specifically on the cracks or eroded area more to enhance them. Then change the brush color to white and paint on the white areas to make them more solid looking. Repeat this process until you are satisfied with the eroded look. Slowly build up the desired look by painting again and again. Due to the Overlay selection mode within the selection white areas will become more white and black or dark areas will become darker. This process will help us to define the eroded look of the text.
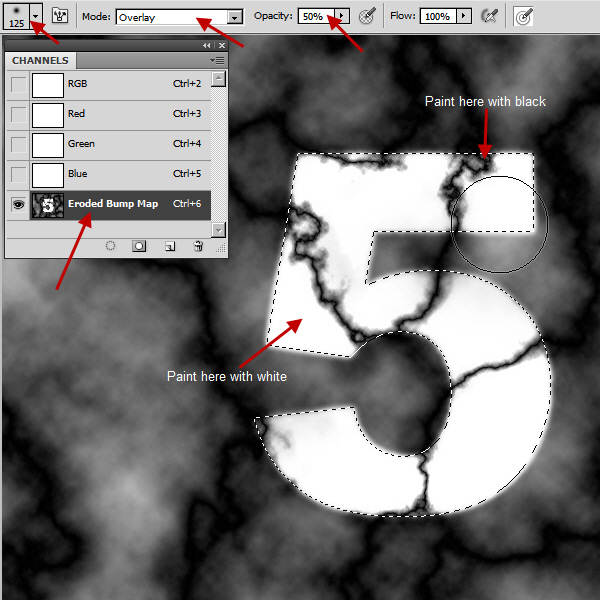
Deselect and check that there is a fine separation line just inside the edge of the text. This will add more detail to the edge later.
Step 12
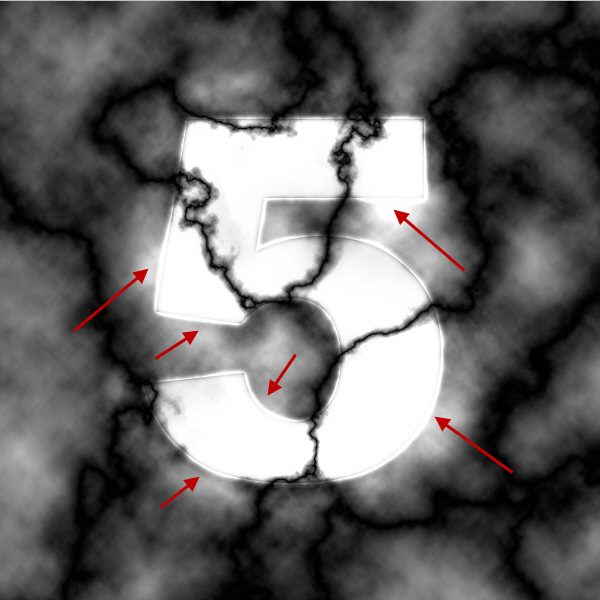
Still deselected, paint again with 50% soft white brush. But this time paint outside the “5” by overlapping the edge of the “5” and a little outside area.
Step 13
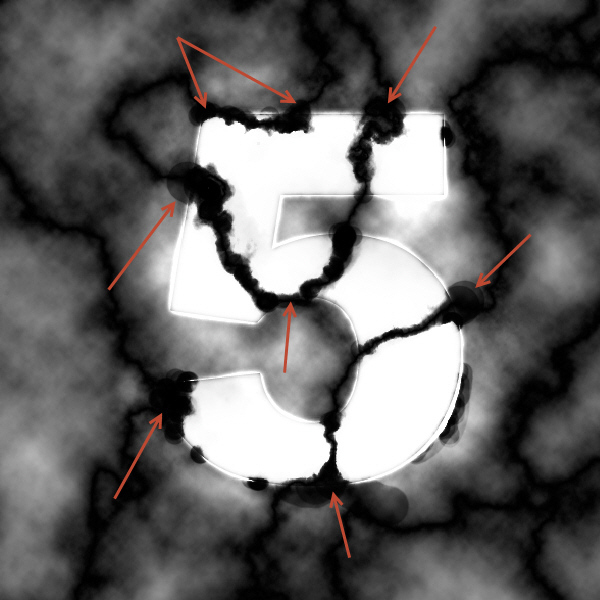
For the finishing touches in this deselected state we will paint with a black brush (Hard, 50% opacity) in normal mode in some of the areas, to give those areas a more solid eroded look.
Step 14
Go back to the Layers Panel and target the “5” layer. Then Filter > Render > Lighting Effects and apply the settings in the screenshot below:
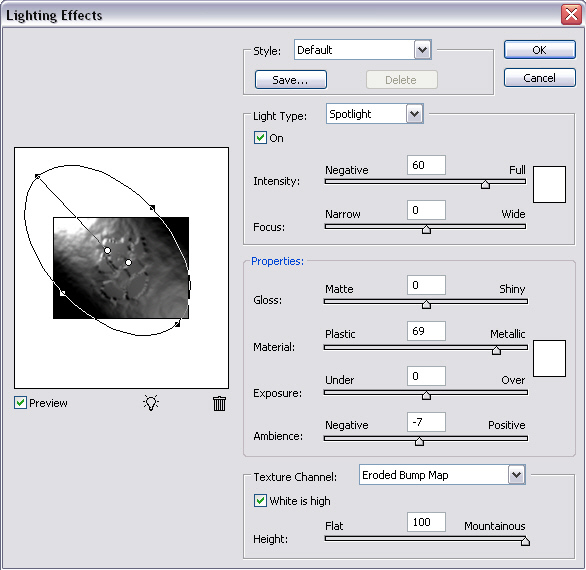
Lighting Effects Filter
The Lighting Effects filter creates various lighting effects on images (RGB only). You can also use textures from grayscale files (called bump maps) to produce 3D-like effects and save your own styles for use in other images.
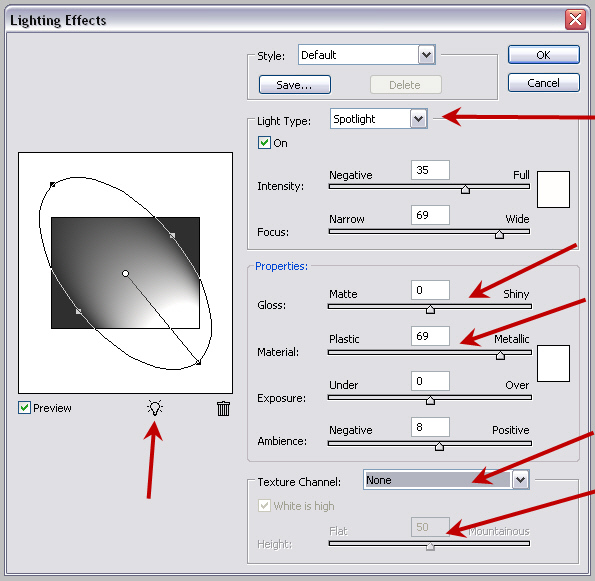
Applying The Lighting Effects Filter
- Choose Filter > Render > Lighting Effects.
- For Style, choose a style.
- For Light Type, choose a type.
- To add light drag the bulb icon from below the preview area to within the preview window.
- To duplicate a light, Alt-drag the light within the preview window.
- The Texture Channel will use any grayscale image (Alpha channel) to give the surface a 3D look. Below the Texture Channel, if White is high option is checked, then the slider will determine the height of the white areas within the bump map.
- Gloss – Determines the gloss/ wet / matte look of the surface.
- Material – Determines which is more reflective: the light or the object on which the light is cast.
- Exposure – Increases or decreases light intensity.
- Ambience – Diffuses the light as if it is combined with other lights.
Limitations of Lighting Effects Filter
- The Lighting Effects filter works only on RGB images.
- Not available in the Filter Gallery of Photoshop CS5.
- Only available in the 32-bit mode of Photoshop CS5. For 64-bit solution check this link
- There are no issues before or after Photoshop CS5
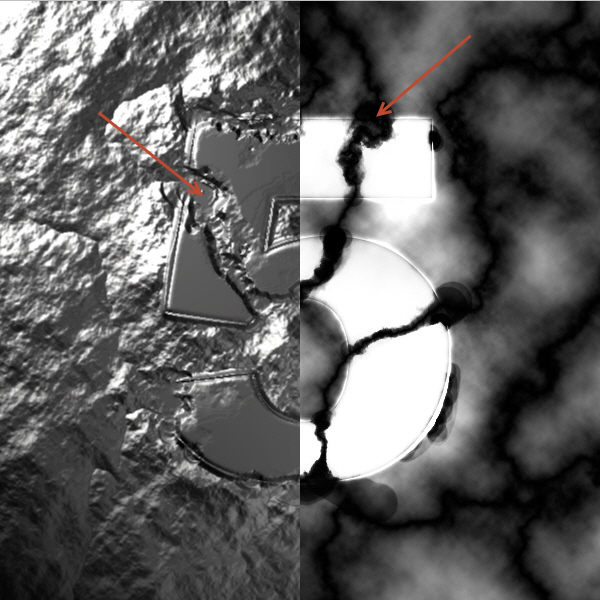
As you can see the look of the eroded surface is dependent on the cloud pattern we created in the alpha channel. Compare the b/w cloud pattern and the rendered eroded surface to see how the white and black areas of the cloud pattern get translated into the final eroded surface. You might want to do this a couple more times to get the desired look. Don’t try to match my eroded surface because that may not be possible due to the random nature of the cloud pattern. Instead try to create an interesting pattern of your own. This will give your surface a unique touch. So experiment with the Clouds – Difference Clouds – Lighting Effects combination.
Step 15
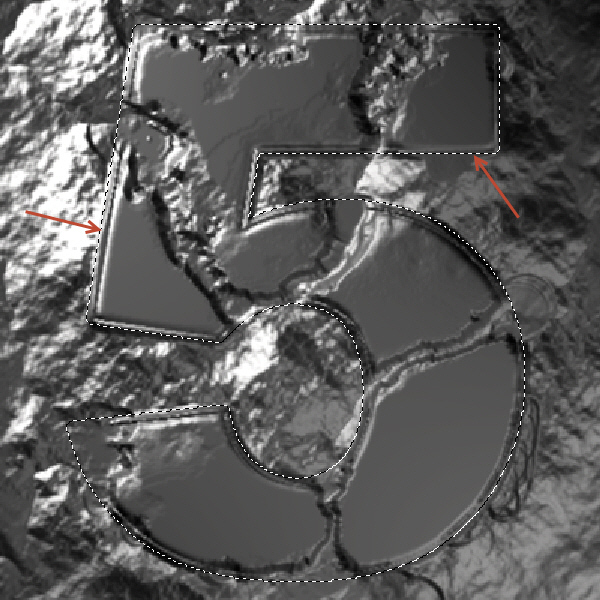
CTRL+ Click on the “5” layer to load as a selection. Target the “Eroded 5” layer and then from Select > Modify > Expand. Use a value of 4 pixels.
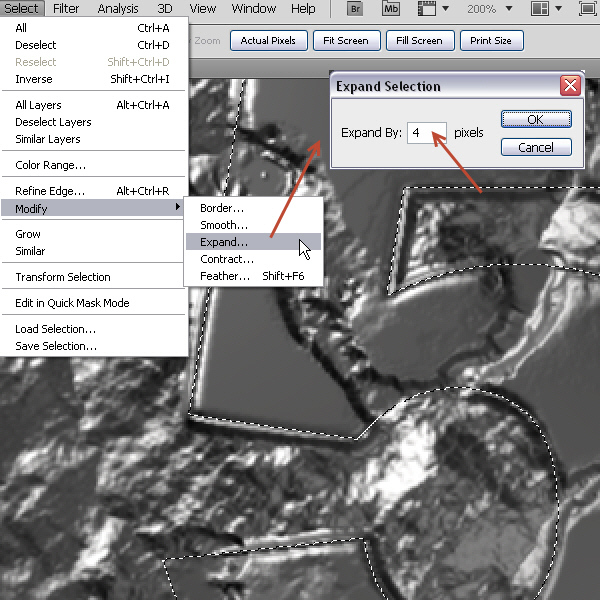
Why we have to do this is because of our use of 2 pixels Feather in the “Eroded Bump Map” channel. As a result, after the Lighting Effects Filter application, the “5 text” expanded a little. Now after the expansion the selection is fitting nicely around the “5”.
Step 16
Now the selection is still active on that “Eroded 5” layer, press Ctrl + J or Layer > Layer via copy to copy the “5” only on a separate layer. Rename the new layer as “Eroded Gold”. Delete the “Eroded 5” layer if you want.
Step 17
Ctrl click on the “Eroded Gold” layer to load that “5” as a selection. Then click on the Add Layer Mask icon below the Layers panel to create a layer mask based on that selection.
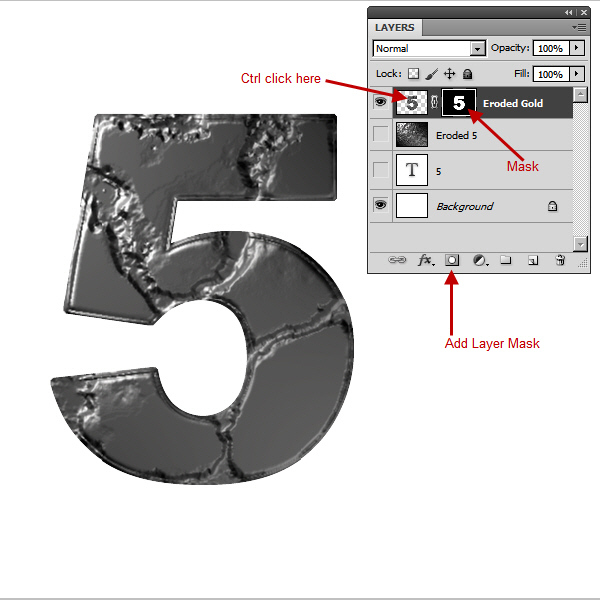
Step 18
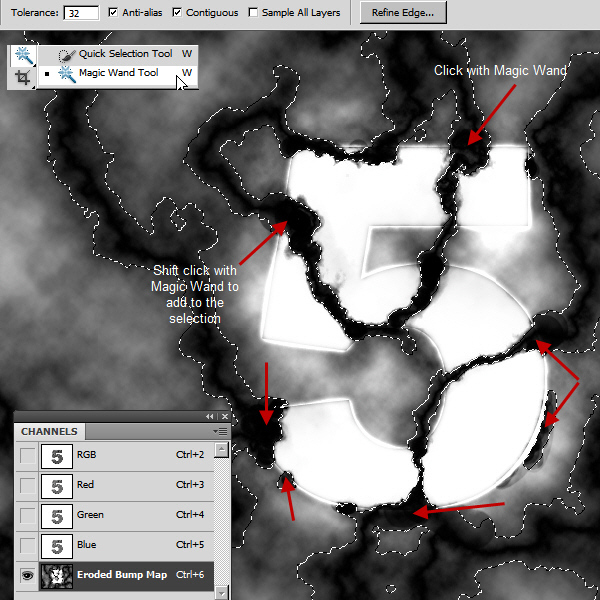
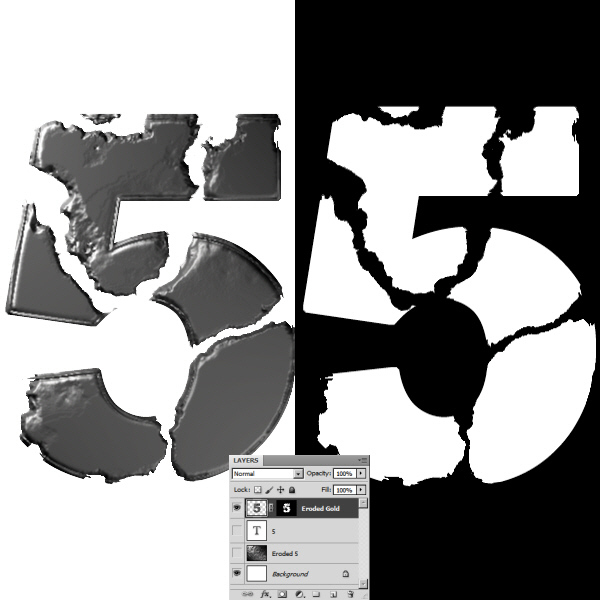
Now go to the Channels panel and target the “Eroded Bump Map” channel. Then select the Magic Wand Tool (W) from the Tools Panel. Now click on the dark eroded areas with the Magic Wand Tool to select them all. Press Shift and click the Magic Wand Tool to add to the selection.
Step 19
With the selection still active go back to the Layers panel and click on the Mask thumbnail of the “Eroded Gold” layer to target that.
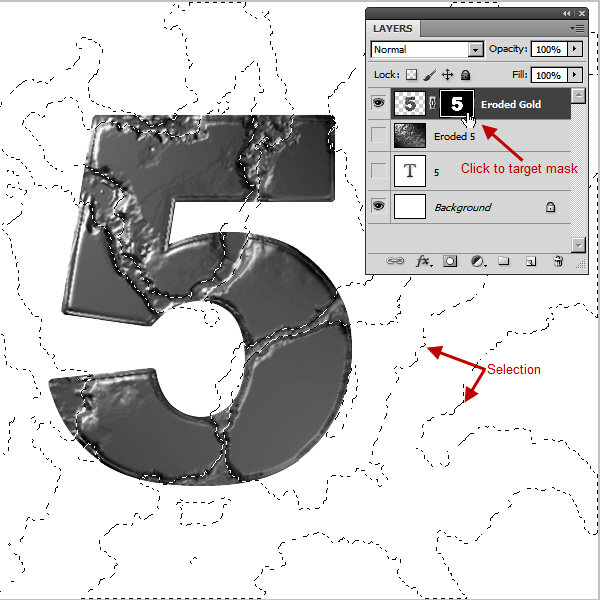
Step 20
Then make sure that black is your foreground color and fill the selection with black.
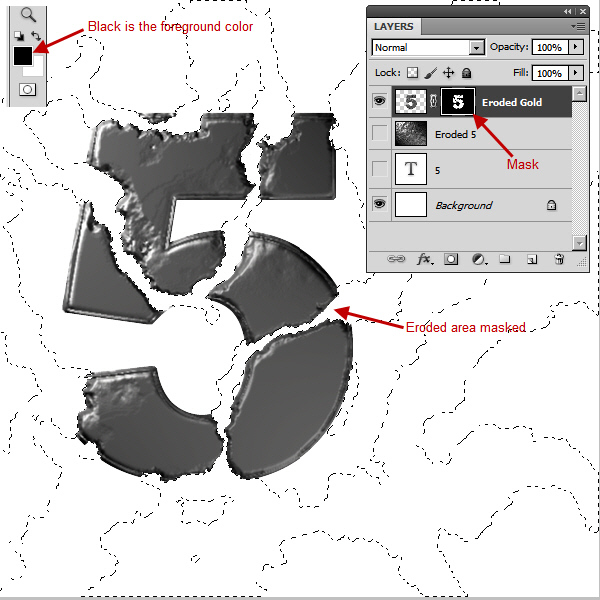
Below are the final eroded text and the mask.
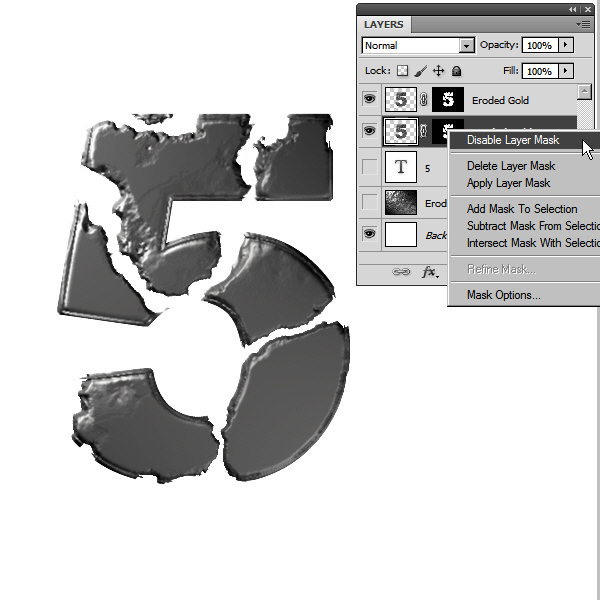
Step 21
Duplicate the “Eroded Gold” layer. Then drag and position the new duplicate layer below the “Eroded Gold” layer. Rename it “Eroded Gold Base”.

Step 22
Right click on the mask thumbnail of “Eroded Gold Base” layer and select Delete Layer Mask.
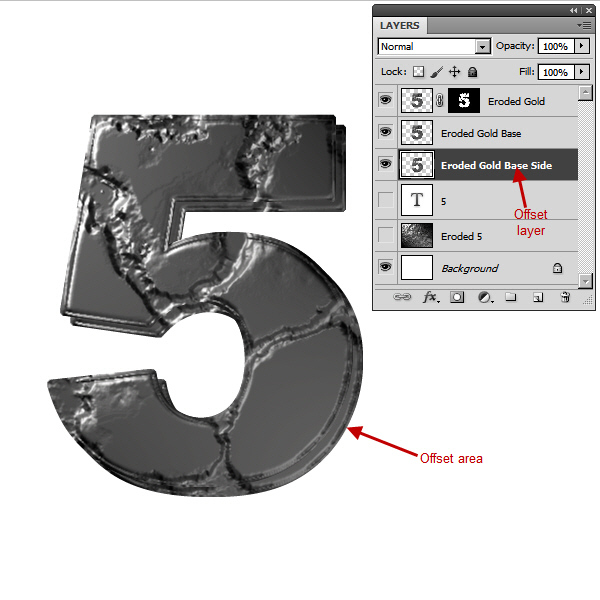
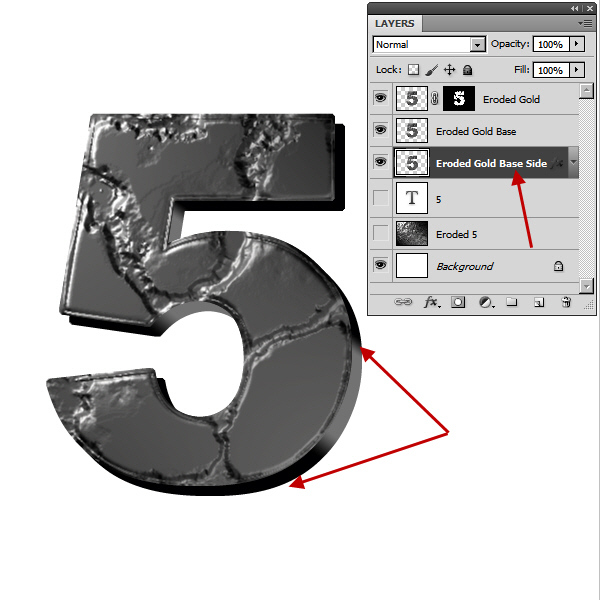
Step 23
Duplicate the “Eroded Gold Base” layer and rename it “Eroded Gold Side”. Then press Shift + Right Arrow and Shift + Down Arrow once from the keyboard. We are offsetting the “Eroded Gold Side” layer to simulate the 3d look of the “Eroded Gold” layer.
Step 24
Double click on the “Eroded Gold Side” layer to open the Layer Style window. Let’s create a Gradient Overlay to define the shaded look of the side of the “5”. This will give it a more 3d look. Match the screenshot for Gradient Overlay settings.
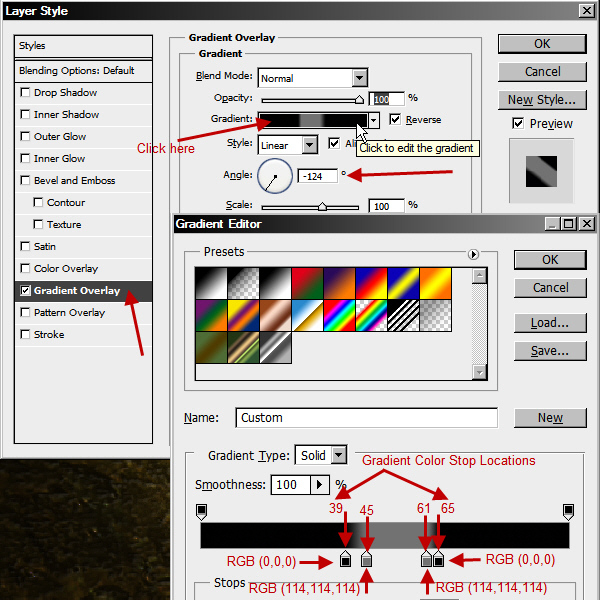
Below is the final look of the side of the 3d “5”.
Step 25
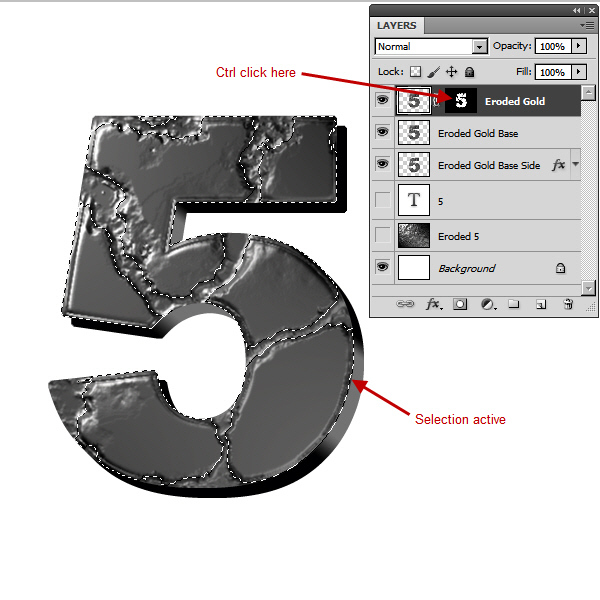
Next we will create a Curves Adjustment Layer on top of the “Eroded Gold” layer. This Curves Adjustment Layer will help us to control the highlight and shadow of the top surface of “5”. First target and Ctrl+click on the mask thumbnail of “Eroded Gold” layer to select it. We will use this selection to create the mask of the Curves Adjustment layer. This Curves Adjustment layer will control the look of the top surface of “5” only, not the eroded areas. For the Eroded areas later we will create another Curves Adjustment layer.
Step 26
With “Eroded Gold” layer still active, create a new Curves Adjustment layer by clicking on the Create a new fill or adjustment layer icon (Fourth from left) below the Layers Panel.
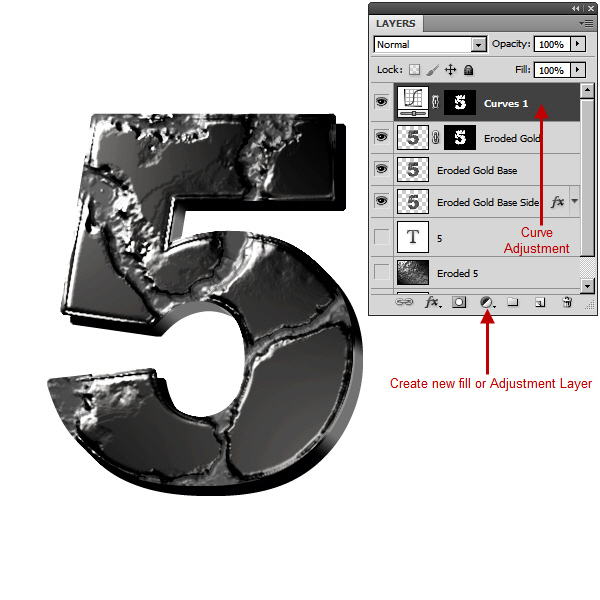
Below is the Curves Adjustment settings (Window> Adustments):
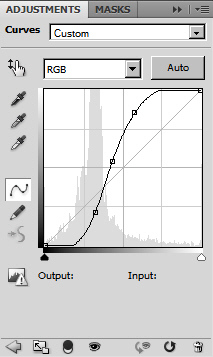
Step 27
Double click on “Curves 1” text of the Curves Adjustment Layer and rename it “Top Surface Curve”.
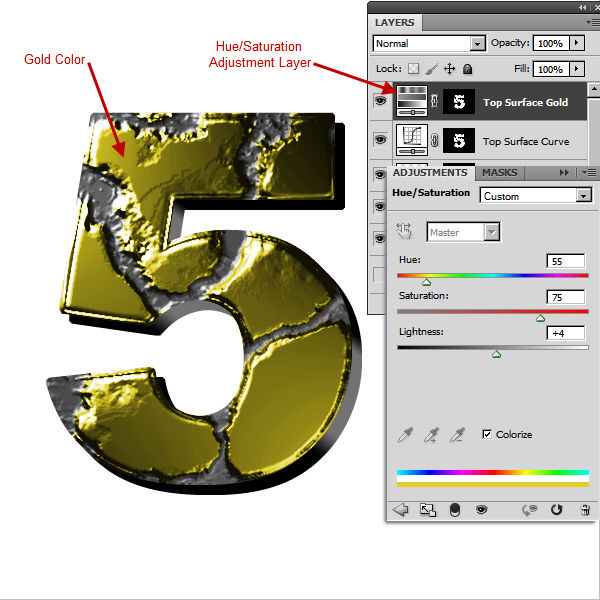
It’s time to create the gold color of the top surface (excluding the eroded areas). Ctrl+click on the mask thumbnail of the “Top Surface Curve” Adjustment layer to select it. Then create a new Hue/Saturation Adjustment layer on top of “Top Surface Curve” Adjustment layer and rename to “Top Surface Gold”. Then use the Hue/Saturation values from the screenshot below:
Step 28
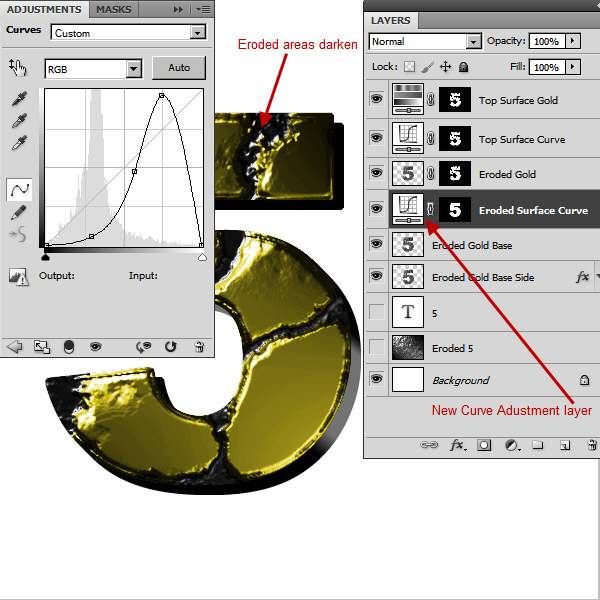
Next we will create the look of the Eroded surface. Following the same procedure we will create two more Adjustment Layers for the eroded areas. But first Ctrl+click on the layer thumbnail of the “Eroded Gold Base” layer to select it. We will use this selection as the mask for the new Curves Adjustment layer. With the selection still active, create a new Curves Adjustment layer with the name “Eroded Surface Curve” on top of the “Eroded Gold Base” layer. Use the settings from the screenshot below:
Step 29
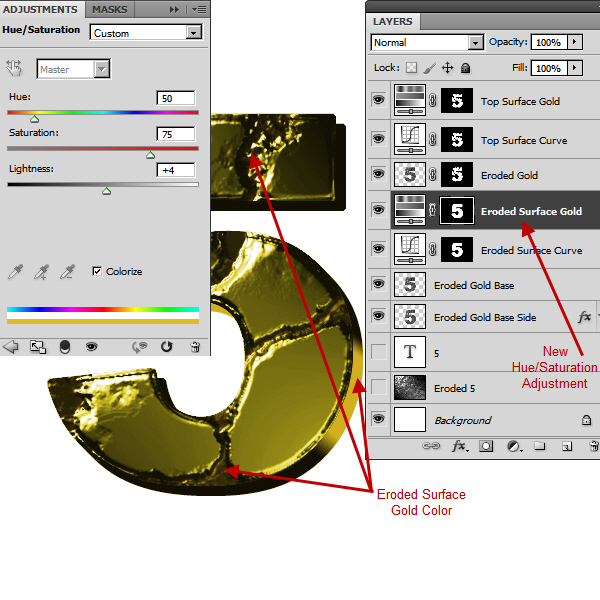
Next we will create the Gold color of the Eroded surface. So we will create another Hue/Saturation Adjustment layer on top of the “Eroded Surface Curve” layer. But the process of creating the mask for this new Hue/Saturation Adjustment layer is a little different. We have to use two different selections from two different layers for this mask. First we Ctrl+click to select the “Eroded Gold Base” layer. Then Ctrl + Shift + click to select the “Eroded Gold Base Side” layer also. By Ctrl + Shift method you can add to an existing selection or simply combine selections. So using this combined mask, create a new Hue/Saturation Adjustment Layer with the name “Eroded Surface Gold” on top of the “Eroded Surface Curve” Adjustment layer. Use the screenshot from below:
Step 30
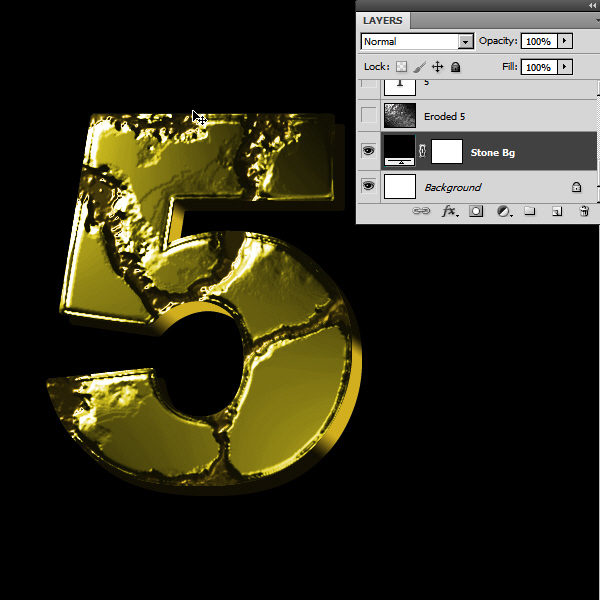
The main Eroded Gold Text effect is complete. Next we create the stone background with a simple layer style. Target the “Background” layer and create a new Fill Adjustment Layer (Solid Color) on top of it.
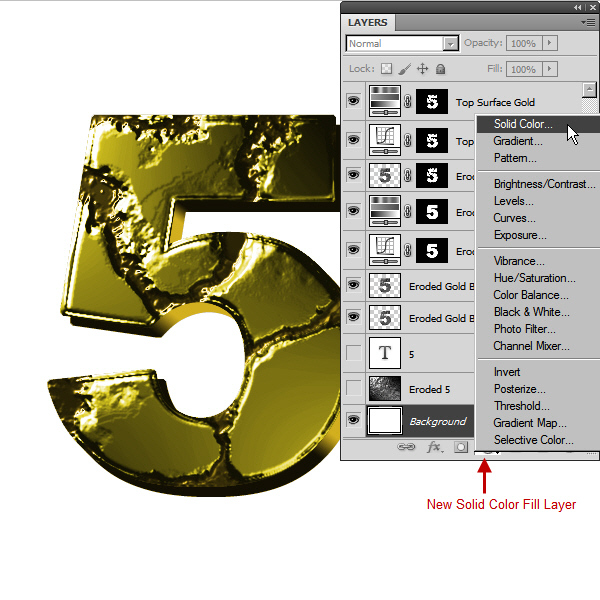
Step 31
In the “Pick a solid color” window select black (RGB 0, 0, 0) as the color and rename the layer “Stone Bg”.
Step 32
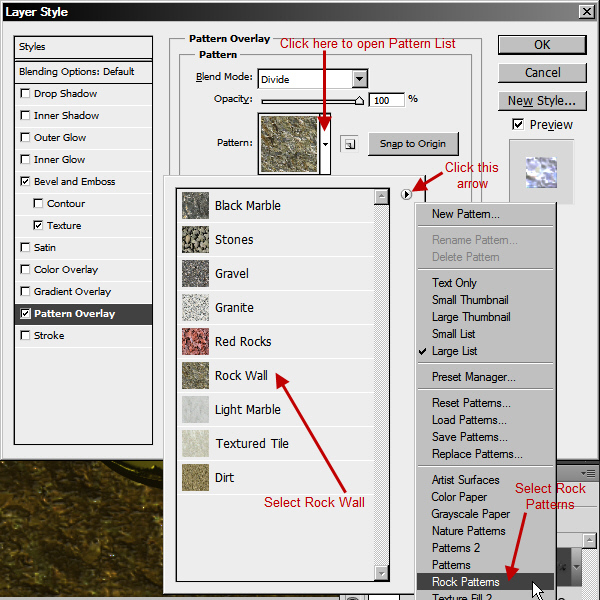
Double click on Stone Bg layer to open the Layer Style window. Create a new Pattern Overlay by clicking on the Pattern Overlay text in the left pane (i.e. Styles) of Layer Style window. Use “Rock Wall” from the Rock Patterns group. In case this pattern is not present in your version of Photoshop, feel free to use any other rock/stone pattern available in the patterns pop-up list. It will change the look of the background a little. But we are not working on any specific look here. This tutorial is rather an understanding of the process, besides being a simple steps tutorial. So explore on your own.
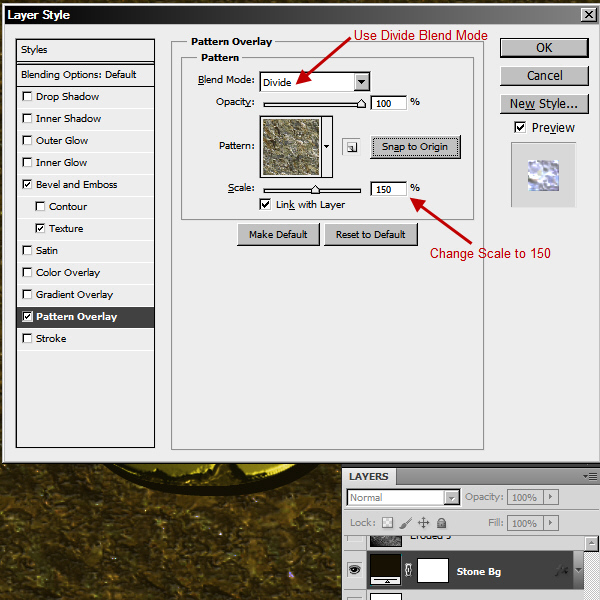
Use Divide as the Blend Mode and change the Scale value to 150.
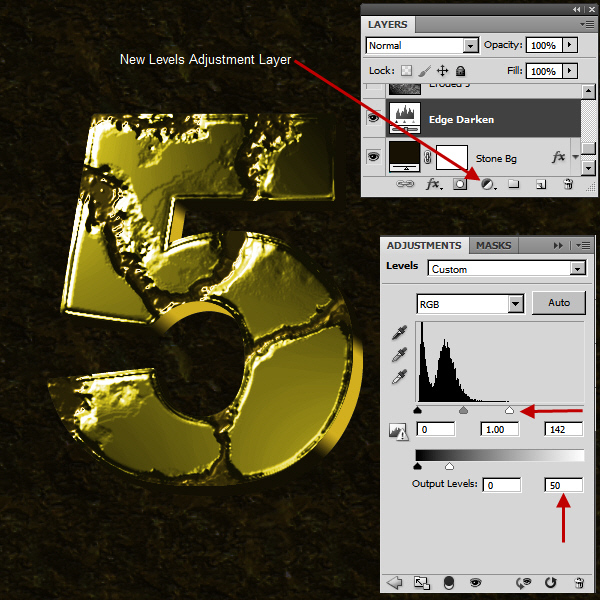
Step 33
Let’s create an Edge Darken effect on top of it. Create a new Levels Adjustment Layer on top of the “Stone Bg” layer with the following settings:
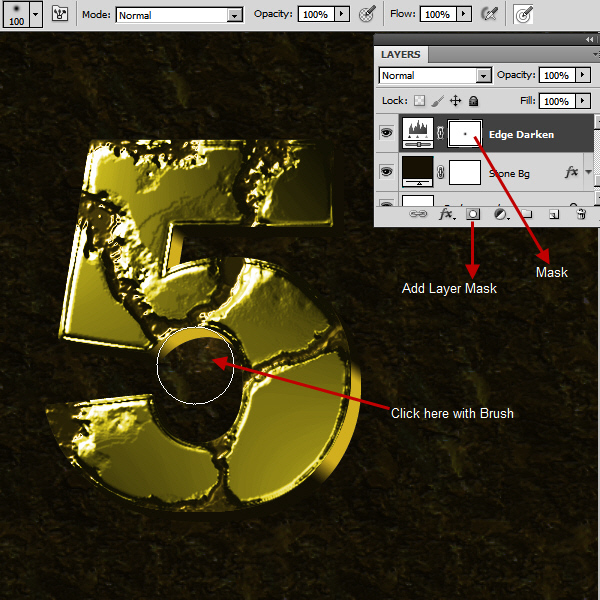
Step 34
Target the “Edge Darken” Adjustment layer and add a Layer Mask to it. Select a 100 pixel soft rounded brush with black and click once in center of the mask. It will look like a small back dot in the mask thumbnail.
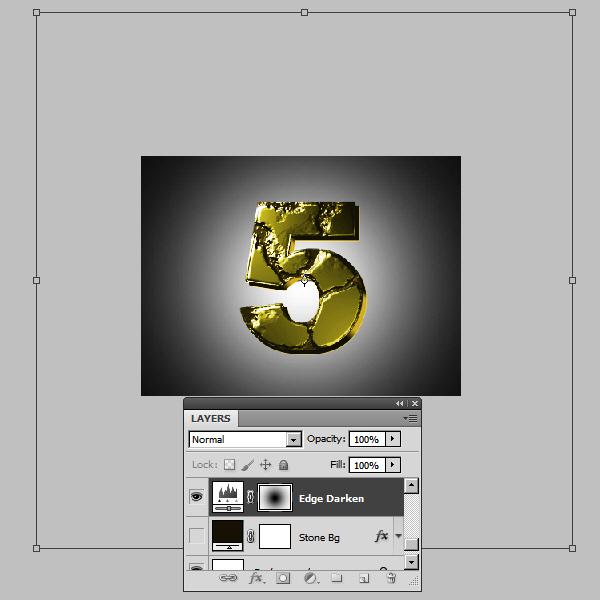
Step 35
Now we have to scale it up. Select the Move Tool (V), then Menu > Edit > Transform > Scale (Ctrl + T). Now scale up the back dot, until it is touching almost the edge of the layer and apply the transformation by pressing the Enter button or double clicking within the transform box. In the screenshot below I have hidden the “Stone Bg” layer to show the transformation of the black dot within the mask prominently.
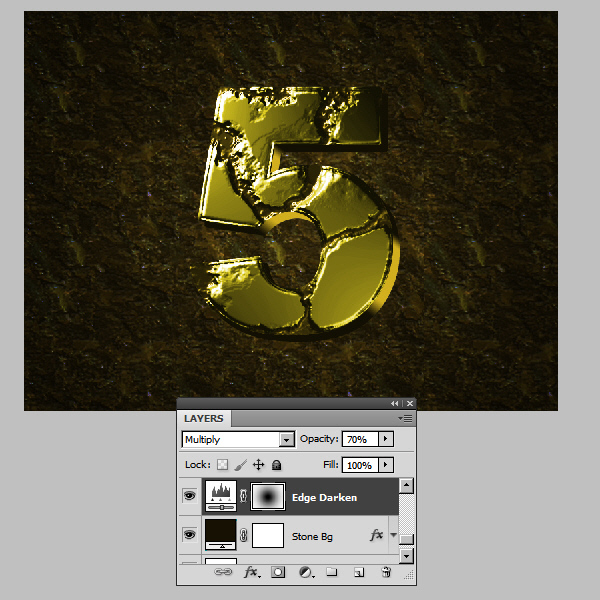
Now change the Blend Mode of “Edge Darken” Adjustment layer to Multiply and layer Opacity to 50%.
Step 36
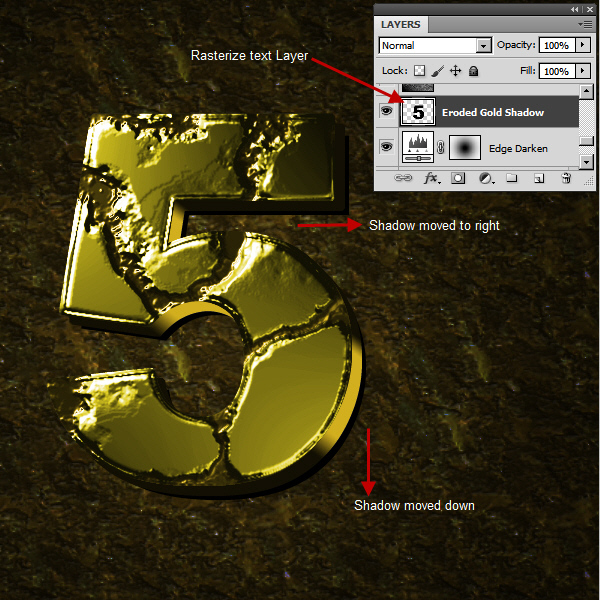
We are almost there. Let’s add some small details like, Shadow, Lens Flare, Glow and Streaks. First we create the shadow. Duplicate the “5” Text layer, then right click on it and select Rasterize Type. Rename the layer “Eroded Gold Shadow” and position it on top of the “Edge Darken” layer. Then use the right and down arrow keys from the keyboard to offset (Move) the shadow a little towards the right and down.
Step 37
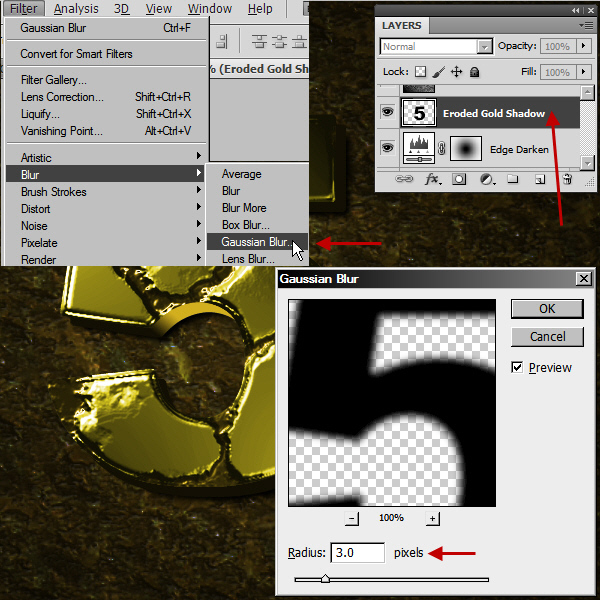
Then target the “Eroded Gold Shadow” layer and from Filter > Blur > Gaussian Blur. Use 3 pixels in the Radius field. Then change the blend mode to Multiply.
Step 38
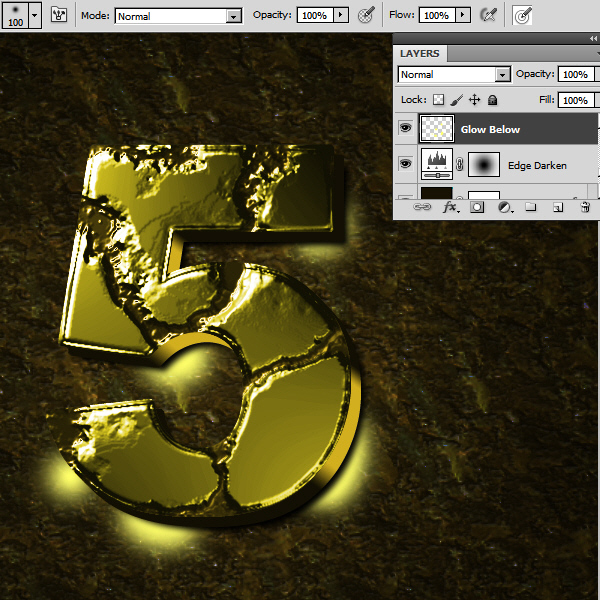
Create a new layer on top of “Eroded Gold Shadow” with the name “Glow Below”. Select a soft brush. Press the Alt key and the Brush Tool will change temporarily to the Eyedropper Tool. Select a light shade of gold with this Eyedropper Tool, then release the Alt key to go back to the Brush tool. Now paint some glow below the “5”. Check the screenshot below:
Step 39
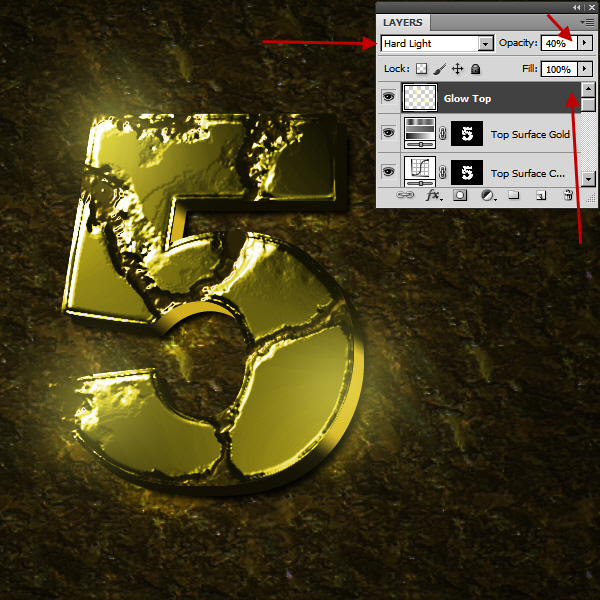
Change the blend mode of the “Glow Below” layer to Overlay. Now create a new layer on top of the “Top Surface Gold” Adjustment layer. Then with the same Brush and color, paint some glow, matching the areas of “Glow Below” layer. Change the layer blend mode to Hard Light and the opacity to 40%.
Step 40
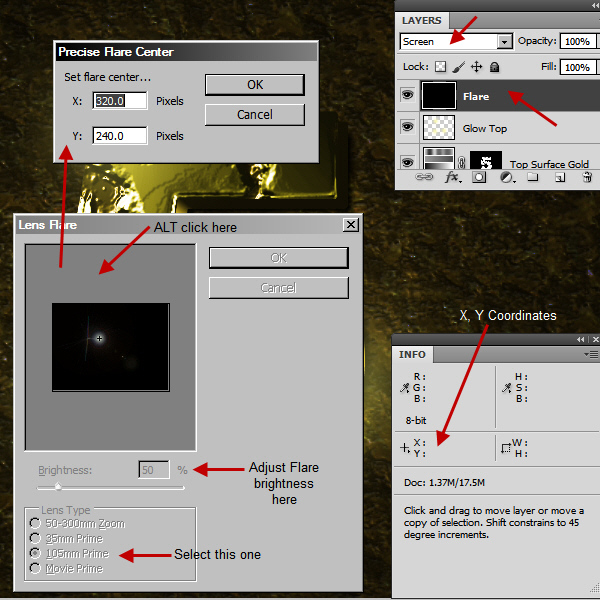
Create a new layer with the name “Flare” on top of “Glow Top” layer and fill with black. We will add Lens Flares matching the “Glow Top” paint spots. But to locate the exact area or center of each paint spot we need the Info panel (Window > Info). Open the Info panel and click on the down facing arrow at the top right corner and select Panel Option. In the Info Panel Options window, click the drop down list, beside the Ruler Units, in the Mouse Coordinates area. Select Pixels as the Ruler units and click the OK button to close the window.

Step 41
Change the blend mode of the “Flare” layer to Screen. Now select the Move Tool (V) position your cursor on the center of each paint spot. Check the Info panel for X and Y coordinates. We will use this data to position the Lens Flares accurately. From Filter > Render > Lens Flare. Alt+click within the Flare preview area to open the Precise Flare Center Window. Use the x, y coordinate values from the Info panel here. Then select 105mm Prime as the Lens type and adjust the brightness.
Step 42
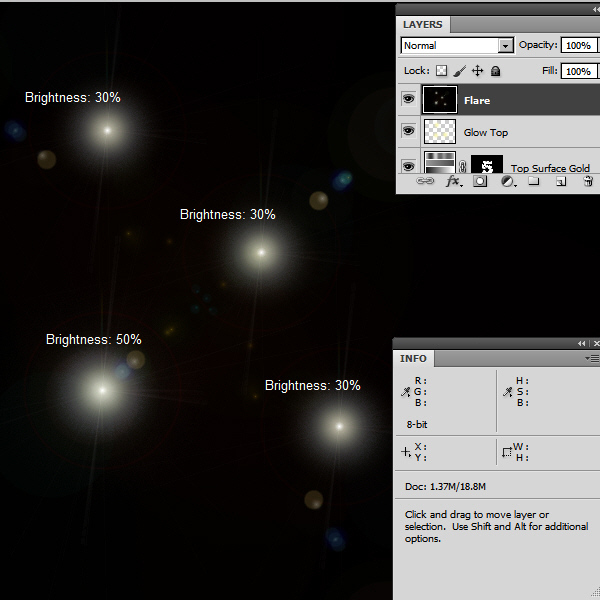
Use the screenshot below for flare values. I changed the screen blend mode to normal mode for showing the exact flares. But feel free to use different flare types and values.
Step 43
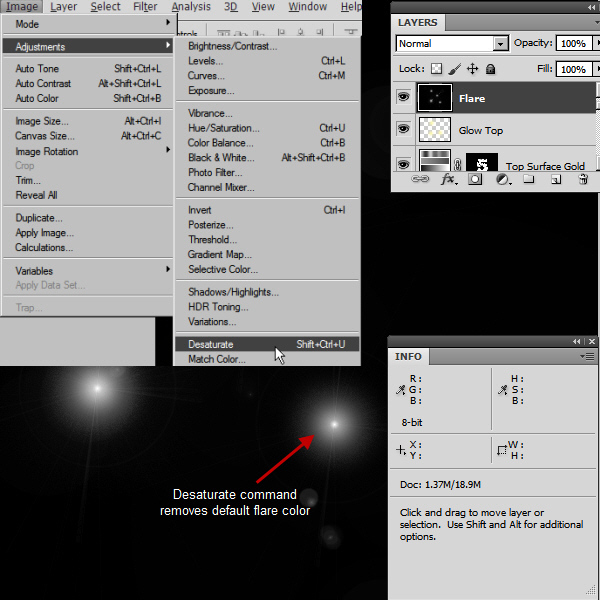
Actually we need the same gold color flares here. To do that first we have to remove the default flare colors. Target the “Flare” layer, then Image > Adjustments > Desaturate. This will remove the default flare colors.
Step 44
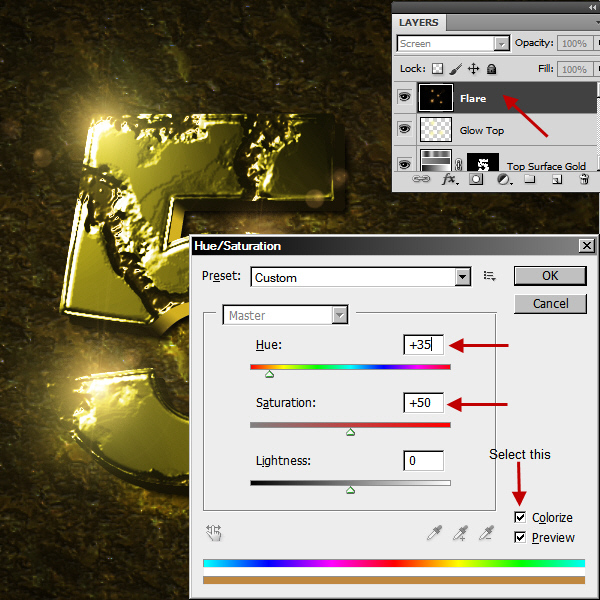
Then again Image > Adjustments > Hue/Saturation, checked the Colorize option first, and then apply the settings from the screenshot below:
Step 45
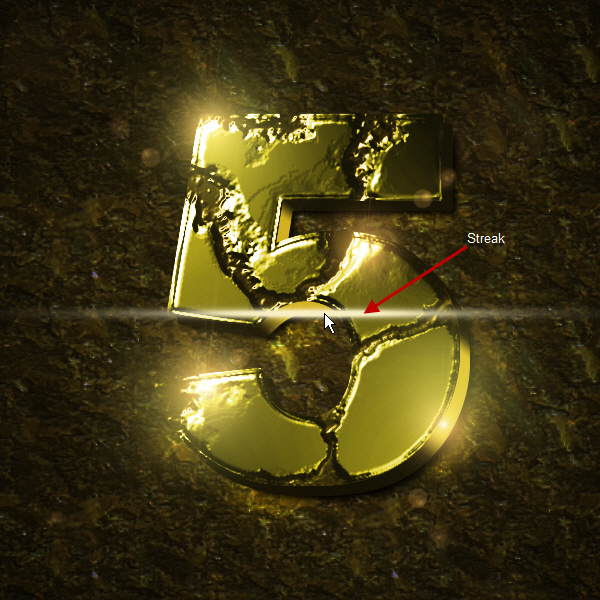
Let’s create the streaks now. Create a new layer on top of the “Flare” layer with the name “Streak 1”. Then select a soft brush and click on the Toggle Brush Panel button beside the brush preset picker. For the Brush Panel settings check the screenshot below:
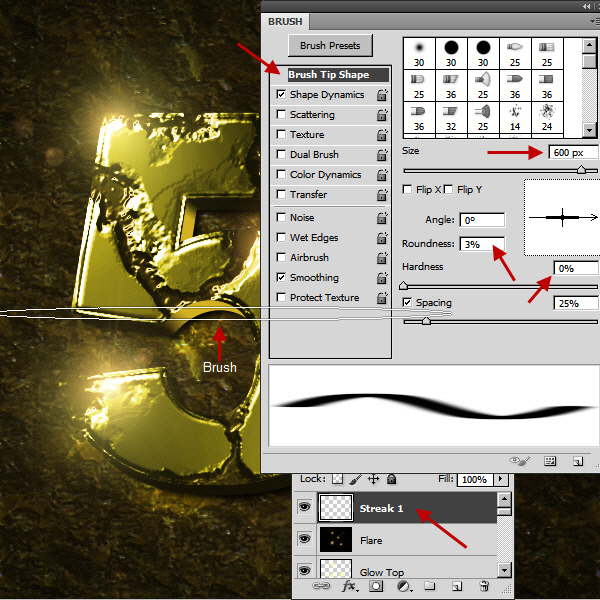
Step 46
Now center the Brush and change the Brush opacity to 30%. Then click and reduce the Brush size by pressing the “[” (Left third bracket) key. Repeat the process, like 30% (One size smaller), 50% (One size smaller again) and then 100% (One size smaller again). So from the outside to the inside the flare becomes more opaque (30% to 100%). Check the screenshot below:
Step 47
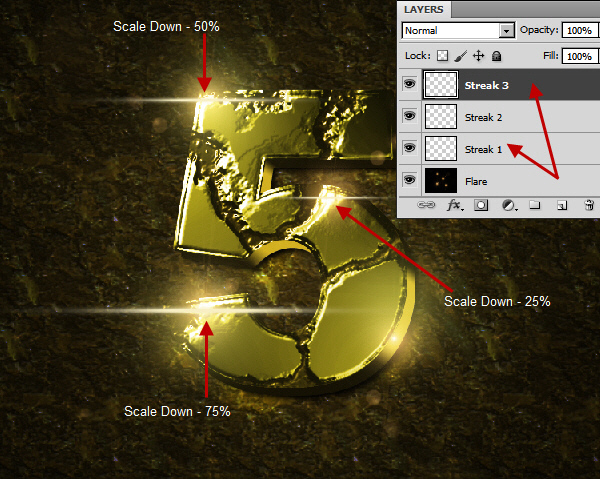
Copy the “Streak 1” layer three times, then rename them to “Streak 2” and “Streak 3”. Then resize the three Streaks with Edit > Transform > Scale (Ctrl + T). Use the screenshot below as a guide for position and placement:
Step 48
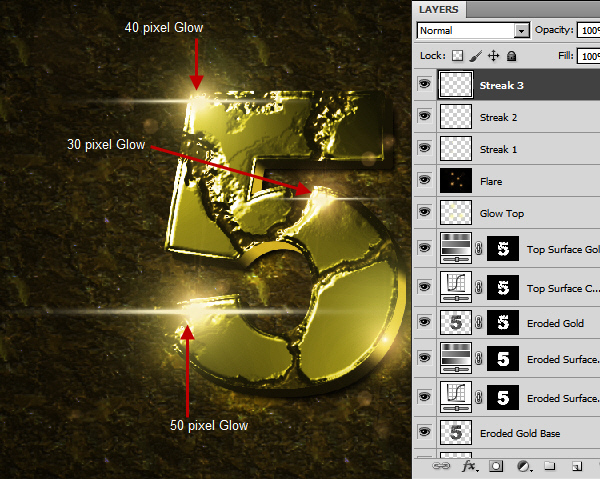
Now we create a Glow center for each Streak layer. Target “Streak 1” layer, then select a 50 pixel Soft Brush with 100% Opacity. Click in the center of the “Streak 1”. Then following the same process, use 30 pixels for the “Streak 2” and 40 pixels for the “Streak 3”.We are not creating a streak for the fourth flare. We are only using that to create a bright highlight spot at the side.
And We’re Done!
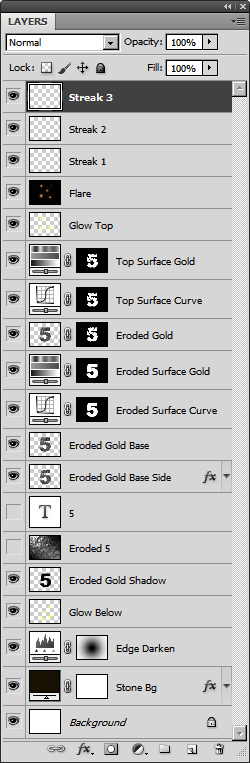
Congratulations, the Eroded Gold Effect is now complete. Below is the final arrangement of the Layers Panel.
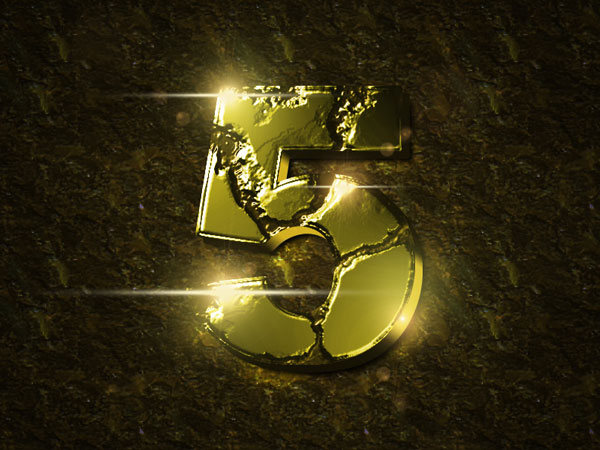
Below is the final result. But you can still tweak and add more details. It’s up to you and your creativity where you want to go from here.