In this tutorial we will heavily modify colors, texture and mood to create a wild looking colored face in Photoshop.
We’ll be using blending modes and a variety of other simple Photoshop tools.
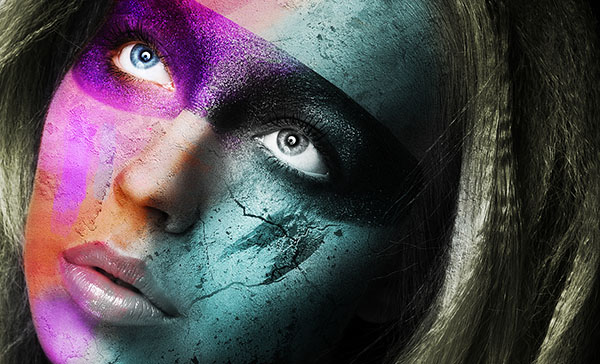
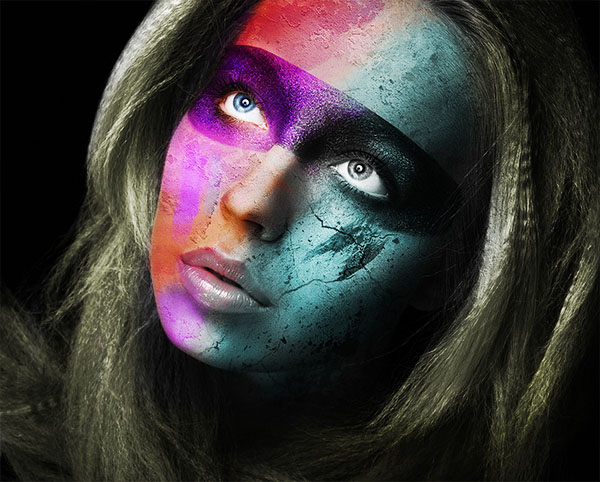
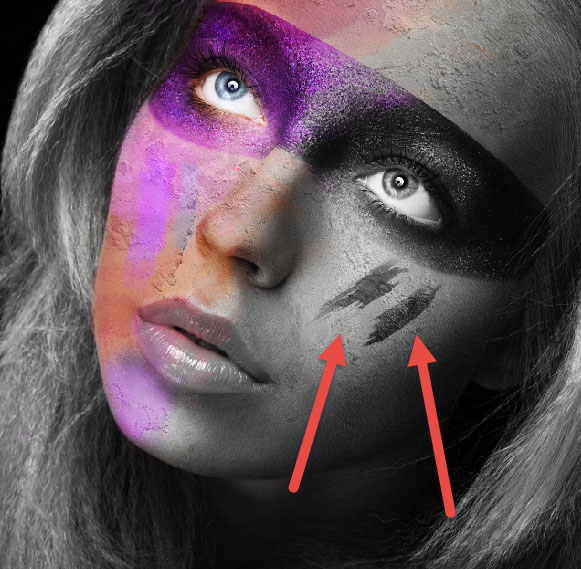
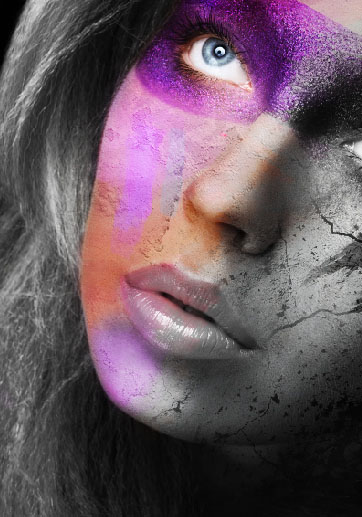
Final Image
As always, this is the final image that we’ll be creating:
Tutorial Details
- Program: Adobe Photoshop CS3
- Estimated Completion Time: 20 minutes
- Difficulty: Beginner-Intermediate
Resources
Step 1
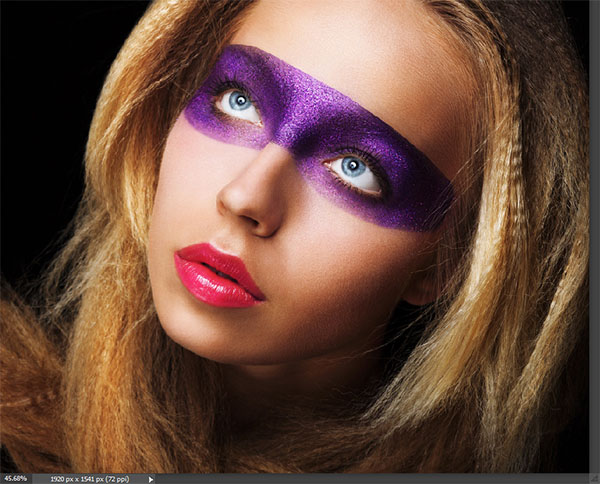
Open the file “Girl”.
Step 2
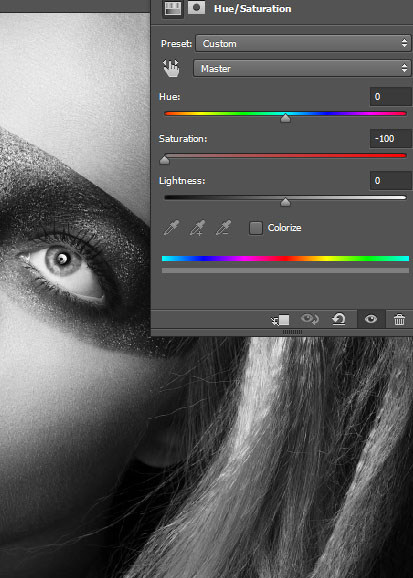
Let’s start by desaturating this image. Create a new Hue/Saturation Adjustment Layer (Layer > New Adjustment Layer > Hue/Saturation) and drag the saturation slider to -100.
Step 3
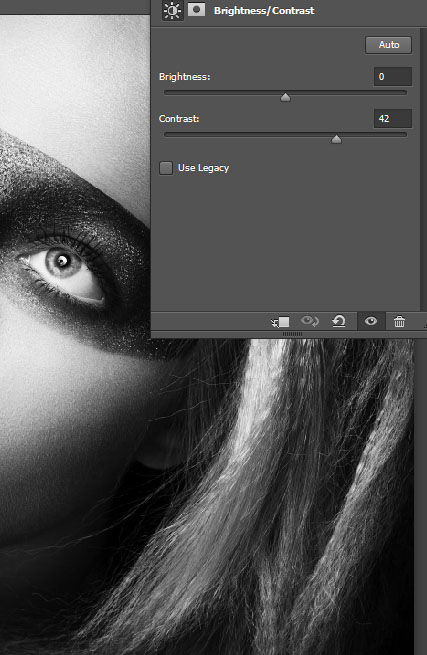
Our scene could use a bit of contrast. Create a new Brightness/Contrast Adjustment Layer by going to Layer > New Adjustment Layer > Brightness/Contrast and dragging the contrast slider to 42.
Step 4
The face looks way too smooth so let’s add a bit of texture to it.
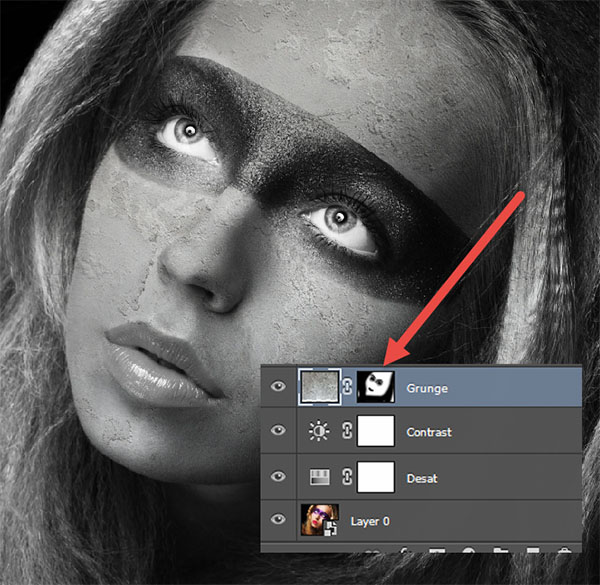
Open the file “Grunge Texture” and copy all by pressing Ctrl + A. Copy with Ctrl + C and go back to our document.
Press Ctrl + V to paste and change the blending mode to Multiply.
Lower the opacity of this layer to 59. As you can see the combination of the Multiply blending mode and a rough texture adds a bit of detail to our image.

Step 5
We want the texture to show only on the face of the girl and not on the hair. Create a layer mask by going to Layer > New Layer Mask > Reveal All. Select the standard round soft brush (B) and set the foreground color to black.
Click on the layer mask to make it active and paint with the brush at 100% opacity over the hair and the hard edges of the texture. You should also paint with black in the layer mask over the eyes – the eyes have to be clear of texture.
In a layer mask black conceals and white reveals so by painting with black we will hide the unwanted sections of the texture.
Step 6
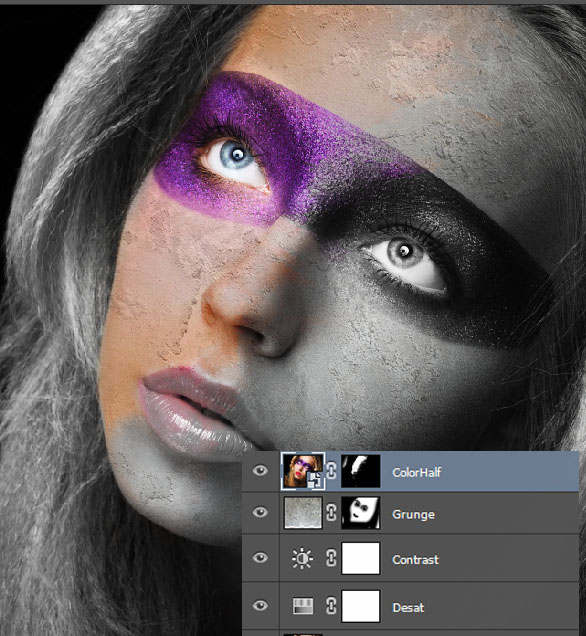
Now let’s add some color to this black textured image. The easiest way to do this is to use the original color of the image.
Click on the “Background” layer and press Ctrl + J to duplicate it. Move this layer on the top of all the other layers in the layers palette (simply drag it with the mouse) and change the blending mode to Color.
Add a layer mask to this layer (Layer > New Layer Mask > Hide All) and choose again the standard round soft brush. Set the foreground color to white and paint on the layer mask the areas you want to be colored (in this case the girl’s left side of the face from our view).
Step 7
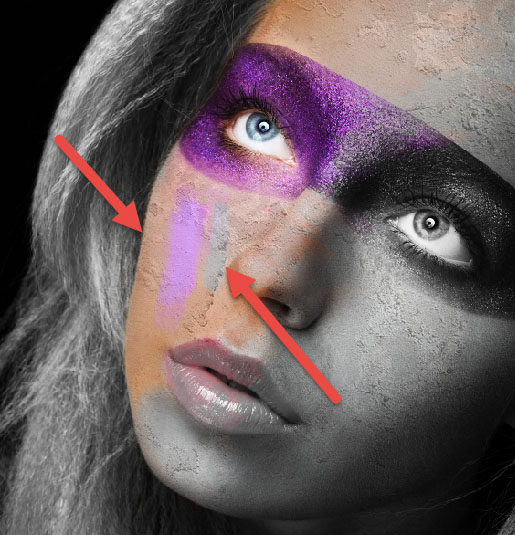
Let’s add some brush strokes on the girl’s face using the already existing colors.
Create a new layer (Ctrl + Shift + Alt + N) and change the blending mode to Color.
Select the standard Chalk brush and set the opacity to 30%. Sample some colors from the face (with the brush tool selected hold Alt and click to pick up a color) and paint a couple of strokes as indicated below.
Step 8
Import the “Watercolor Brush” (simply double click the downloaded .abr file) and create a new layer with Overlay as the blending mode.
Set the brush opacity to 30% and sample a color from the girl’s face. Click with a couple of different watercolor brushes in the areas indicated below to create some nice textured patches of color.

Step 9
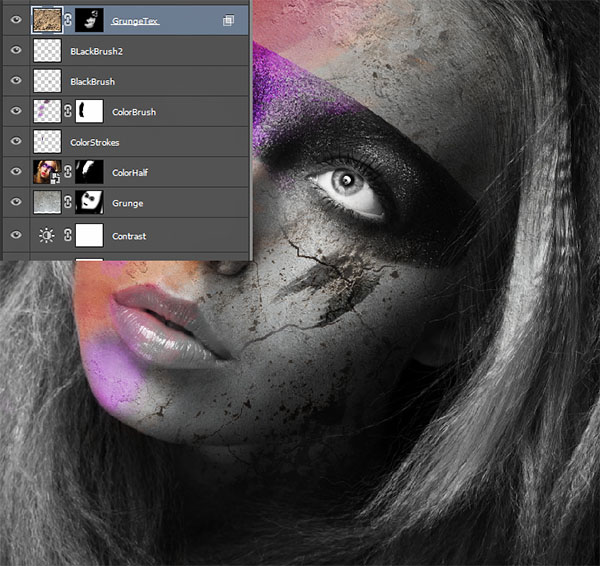
Create a new layer and set the blending mode to Overlay. With a small watercolor brush and black as the foreground color click once or twice to create two patches of black paint in the area indicated below.
Step 10
Open the file “Grunge Texture 2”. Select all and copy/paste the texture in our scene. Change the blending mode to Multiply and add a layer mask (Layer > New Layer Mask > Hide All). With white as the foreground color paint with the round soft brush at 100% opacity paint in the layer mask over the girl’s cheek as indicated below to reveal some texture.
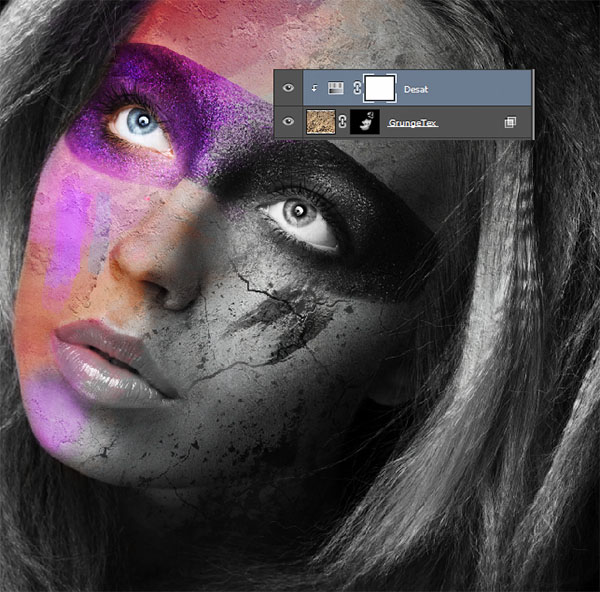
Step 11
We don’t want the color of the texture to be visible on the girl’s face so let’s desaturate it. Create a new Hue/Saturation Adjustment Layer and drag the saturation slider to -100.
Clip the Hue/Saturation Adjustment Layer to the texture layer so that the desaturation effect will be limited only to the texture.
In order to clip a layer to another simply Alt-click between the two layers in the layer palette.
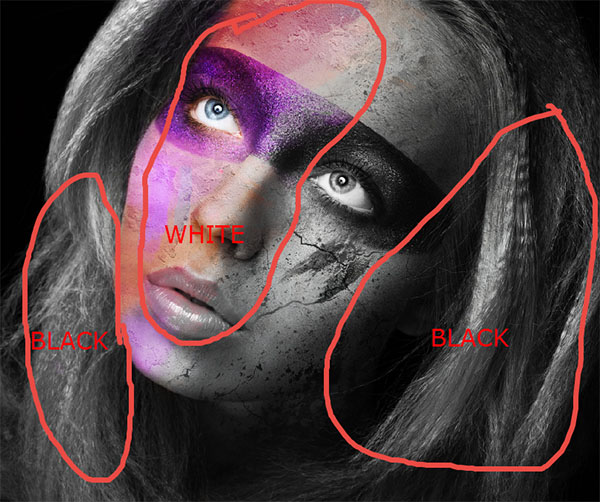
Step 12
Let’s create some lightning in our scene that will create some focus. Create a new layer and change the blending mode to Overlay. With the standard round soft brush at 10% opacity paint with black and white over the indicated areas.
Step 13
Create a new layer from all the visible layers by pressing Ctrl + Shift + Alt + E and change the blending mode to Soft Light.
Lower the fill to 35% and apply a 40px Gaussian Blur (Filter > Blur > Gaussian Blur). This step will soften and at the same time enrich the overall tones.
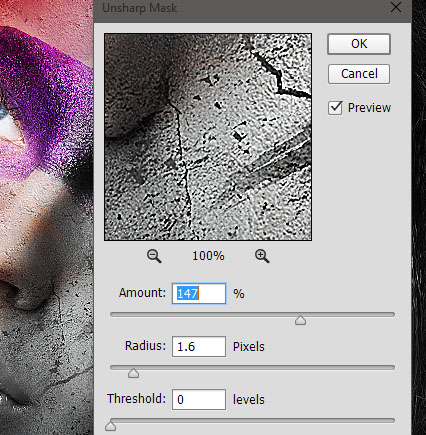
Step 14
Create a new layer from all the visible layers again (Ctrl + Shift + Alt + E) but this time add a subtle sharpen effect (Filter > Sharpen > Unsharp Mask).
Add a layer mask to this layer (Layer > Layer Mask > Hide All) and with the round soft brush at 100% opacity paint on the layer mask over the girl’s face to reveal the sharpen effect there.
This step is usually called selective sharpening and it brings subtle focus to the sharpened areas thus improving our scene overall look.
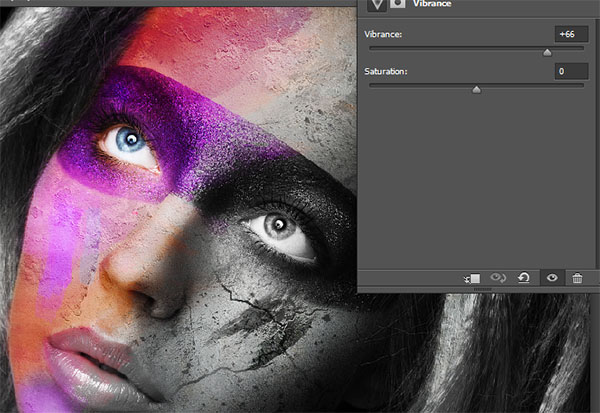
Step 15
Boost the saturation of the existing colors by creating a Vibrance Adjustment Layer (Layer > New Adjustment Layer > Vibrance) and setting the vibrance slider value to 66).
Step 16
Let’s increase the contrast of our image. Create a Brightness/Contrast Adjustment Layer (Layer > New Adjustment Layer > Brightness/Contrast) and move the contrast slider to 33.
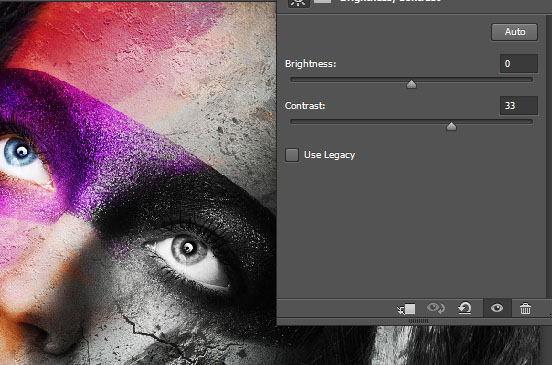
Step 17
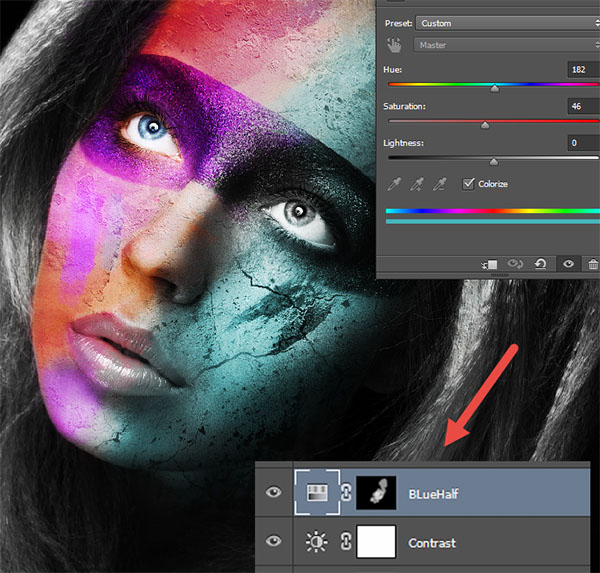
Let’s color the dark side of the girl’s face. Create a new Hue/Saturation Adjustment Layer and use the settings shown below to create a nice strong blue color.
We want this color to be applied only to the right side of the girl’s face (from our view) so fill the existing layer mask with black (click on the layer mask, and press Ctrl + I to invert the color of the layer mask – because it was already white now will be black) and with the standard round soft brush paint with white over the areas you want colored.
Step 18
Create another Hue/Saturation Adjustment Layer and use the settings shown below. Fill the layer mask with black and this time paint with the round soft brush over the girl’s hair to apply the color there.

And We’re Done!