
Do you want to make cartoon style wallpaper by yourself? Ok, then this tutorial special for you.
Now we’re going to make a really nice starlit night background. Create a new document in Photoshop, something like 1920×1200 px and drag a linear gradient with colors of #000000 and #141b4c.

Create one more new layer with Layer > New > Layer and fill it with black color. Ok, now we will try to create cartoon starlit night effect. For this apply Filters > Noise > Add Noise with similar settings to these:

To get the picture like this:

Then to make stars on the sky more realistic use Image > Adjustments > Brightness/Contrast with the next presets:

To get the next effect:

And apply one more time Image > Adjustments > Brightness/Contrast with the next presets:

We received the next picture:

After press Ctrl+T and enlarge the size of image on layer about two times. Invert picture with Ctrl+I and use Image > Adjustments > Levels with similar settings to these:

In this way we increase the contrast of image that gives us well expressed, clear stars.

Press Ctrl+I again to invert image back and change the layer mode for this layer to Screen.
Now comes the important part, we need to take off superfluous groups of stars. For this apply Eraser Tool with brush size 50 px and erase away content layer selectively. So, now you’ve got something interesting like that:

Then apply Filter > Sharpen > Sharpen and set up opacity of 35% for this layer.

To make the stars at the bottom of the picture more transparent apply Quick Mask Mode with gradient as below:

Then go back to Standard Mode. Now we have some selected area.

Press Del to clear image into the area and press Ctrl+D to deselect area.

Ok, now time to add a couple of bright stars on the night sky. Create a new layer (Layer > New > Layer) then get out the Brush Tool and using a star brush like as below, dot a few times onto your dark canvas.

Now we have picture as below:

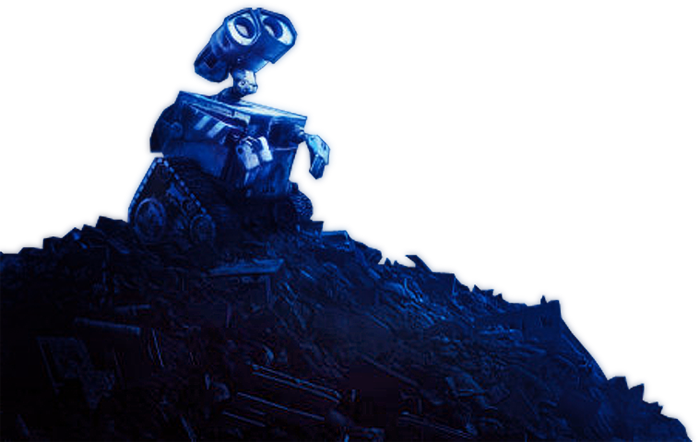
Looks good! The next step what we need to bring pictures of heroes to our wallpaper. Actually, you can use different pictures of heroes of this cartoon. I prefer to use two of those, for example Wall-E & Eva.
If you want to download images of heroes used above, please feel free: Wall-E.png and Eva.png
Well, I would like to bring some luminescence to picture of Wall-E to create a feeling of moonlight. For his effect right-clicking the layer in the layer’s palette then going into the Blending Options. When you’re in the Blending Options, click and apply the following layer styles/settings:


Ok, now time to add the second picture. Bring it to the canvas, then turn and reduce it twice as shown on the picture below. Use Blending Options to add some white glowing. When you’re in the Blending Options, click and apply the following layer styles/settings:


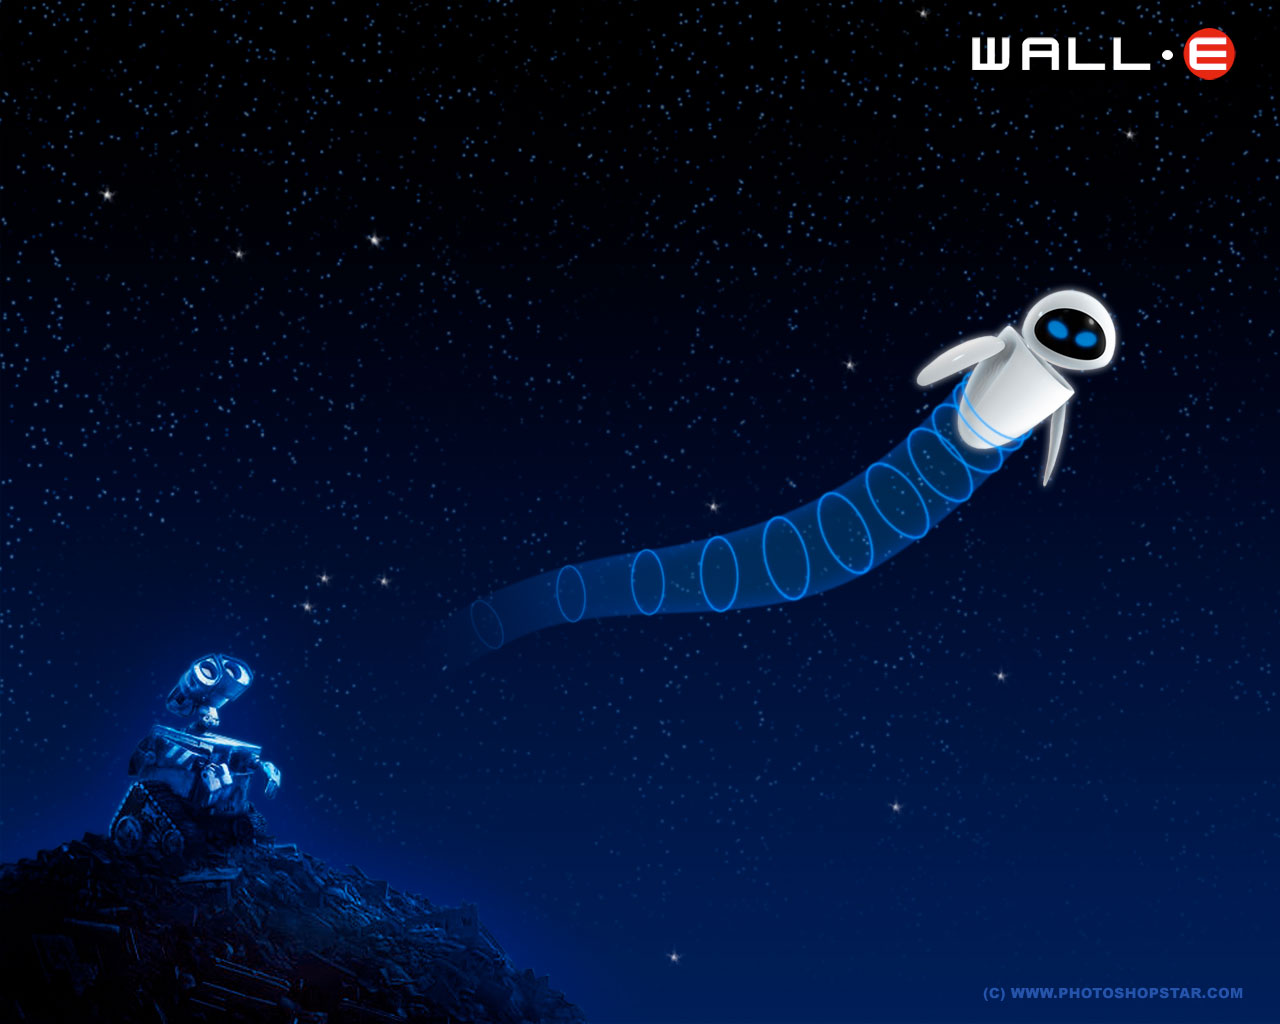
The next step what we need to add some flying trace to our second hero of Eva. Do this by using Pen Tool with color of #4698f9. Look at picture below:

Then set up fill of 20% for this layer. Now, head into the Blending Options for this layer, so right-click your layer and go into the Blending Options and apply the following layer styles:

After apply Filter > Blur > Gaussian Blur with similar settings to these:

The flying trace is fantastic:

Well, to make flying trace more interactive we can add some details on it. For this make selection with Elliptical Marquee Tool and fill our selection with color of #4698f9 like on a picture below:

Then apply Select > Modify > Contract and contract selection about 3 px, press Del to clear selected area:

Apply Filter > Blur > Gaussian Blur with the next presets:

To get a picture below:

Now, duplicate this circle a couple of times to get the next electric flying trace:

Ok, now we need to put our robot into the circles. For this effect select the robot (Select > Load Selection) and cut away fore-part of circles with Eraser Tool like on picture below:

Press Ctrl+D to deselect area and apply Quick Mask Mode with gradient as below for all two layers of flying trace:

Then go back to Standard Mode. Now we have some selected area.

Press Del to clear images into the area on the layers and press Ctrl+D to deselect area. Then go to the layer with electric circles and head into the Blending Options for this layer, so right-click your layer and go into the Blending Options and apply the following layer styles:

Ok, to finish our wallpaper let’s add some text. Get out the horizontal Type Tool (just the regular one) and write out something like ‘Wall E’ in the upper left corner:

To add little white and big red (#dc0028) circles use Ellipse Tool as below:

Great! Our work is done! Enjoy your own cartoon style wallpaper!
Download wallpaper:
1024×768 | 1280×1024 | 1280×800 | 1440×900 | 1680×1050 | 1920×1200