
One more Photoshop tutorial how to create the leather binding and embossing effect.
First of all, make a new document in Photoshop. I created a new document sized 500×300 pixels with all the default settings, RGB, 72 dpi and fill it with color of #424947.

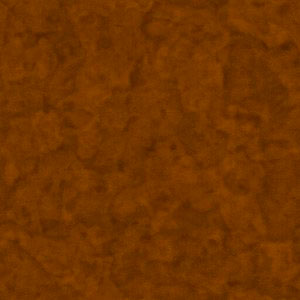
After that use Google search to find some appropriate picture of leather texture to use in tutorial. Then bring it onto the canvas like on picture below:

Press Ctrl+J to duplicate this texture and move it a little bit left. Then use the Eraser Tool (Opacity: 50%) to make texture edges softer.

Now you can merge two of this texture layers. Using the Rectangular Marquee Tool create selection like below and cut away selected part of image.

Remove the selection with Ctrl+D and apply the Drop Shadow layer style to this layer:


Now get out the Line Tool (Weight: 5 px) and draw a black line:

Add one more white line with Line Tool:

Merge two of lines in one layer and apply Filter > Blur > Gaussian Blur with similar settings to these:

Now we have something like this:

Change layer mode to Overlay and set up opacity to 70%.

Time to create binding. Get out the Pencil Tool and draw the hatch like on my picture. Use the color of #cdc08c.

After that apply Drop Shadow and Bevel and Emboss layer styles to this hatch layer:


After that I would like to bring the hatch more realistic view. For this effect create a new layer and make selection using the Rectangular Marquee Tool like on a picture below. Then drag the selected area with white to transparent gradient.

Make the same things from the other side of the hatch using black color on the same layer:

Remove the selection with Ctrl+D, then get out the Eraser Tool and a soft round brush (Size: 5 pixels, Opacity: 70%) and clear area between stitches.

Ok, we are done with this part of tutorial. Now I would like to add some text and design element. Get out the Horizontal Type Tool and write out some text in two lines and different layers using the color of #ffff00:

In the above image I’ve used a font called Script MT Bold, which is sadly a commercial font. Feel free to try a different font if you don’t have it. After that apply Outer Glow, Bevel and Еmboss, Color Overlay and Gradient Overlay layer styles to each of two text layers:


Alright, now, hopefully your text looks something like this:

After that I would like to add some design element. Get out the Custom Shape Tool and select Leaf Ornament 2 (this is standard shape).

Use color of #ffff00 to get the picture as below:

After that go to the text layer and copy layer style with Layer > layer Style > Copy Layer Style, then go back to shape layer and paste it with Layer > layer Style > Paste Layer Style:

Now correct the Bevel and Emboss layers style like on my picture below:

Now we have something like this:

Well, thank you for reading this tutorial everyone! I hope you enjoyed it and learned a thing or two.